 Open any editor to create a bash file.
Here, nano editor is used to create the file and filename is set as ‘First.sh’
$ nano First.sh
Add the following bash script to the file and save the file.
#!/bin/bash
echo "Hello World"
Open any editor to create a bash file.
Here, nano editor is used to create the file and filename is set as ‘First.sh’
$ nano First.sh
Add the following bash script to the file and save the file.
#!/bin/bash
echo "Hello World"
 You can run bash file by two ways.
One way is by using bash command and another is by setting execute permission to bash file and run the file.
Both ways are shown here.
$ bash First.sh
Or,
$ chmod a+x First.sh
$ ./First.sh
You can run bash file by two ways.
One way is by using bash command and another is by setting execute permission to bash file and run the file.
Both ways are shown here.
$ bash First.sh
Or,
$ chmod a+x First.sh
$ ./First.sh


 You can check the following link to know more about the use of bash comment.
https://linuxhint.com/bash_comments/
You can check the following link to know more about the use of bash comment.
https://linuxhint.com/bash_comments/
 You can check the following link to know more about the use of while loop.
https://linuxhint.com/bash-while-loop-examples/
You can check the following link to know more about the use of while loop.
https://linuxhint.com/bash-while-loop-examples/
 You can use for loop for different purposes and ways in your bash script.
You can check the following link to know more about the use of for loop.
https://linuxhint.com/bash-for-loop-examples/
You can use for loop for different purposes and ways in your bash script.
You can check the following link to know more about the use of for loop.
https://linuxhint.com/bash-for-loop-examples/
 You can check the following link to know more about the use of user input.
https://linuxhint.com/bash-script-user-input/
You can check the following link to know more about the use of user input.
https://linuxhint.com/bash-script-user-input/


 You can check the following link to know more about the use of command line argument.
https://linuxhint.com/command_line_arguments_bash_script/
You can check the following link to know more about the use of command line argument.
https://linuxhint.com/command_line_arguments_bash_script/


 You can check the following link to know more about bash arithmetic.
https://linuxhint.com/bash_arithmetic_operations/
You can check the following link to know more about bash arithmetic.
https://linuxhint.com/bash_arithmetic_operations/


 You can check the following link to know more about the use of bash function.
https://linuxhint.com/return-string-bash-functions/
You can check the following link to know more about the use of bash function.
https://linuxhint.com/return-string-bash-functions/

 You can check the following link to know more about directory creation.
https://linuxhint.com/bash_mkdir_not_existent_path/
You can check the following link to know more about directory creation.
https://linuxhint.com/bash_mkdir_not_existent_path/
 You can check the following link to know the different ways to read file.
https://linuxhint.com/read_file_line_by_line_bash/
You can check the following link to know the different ways to read file.
https://linuxhint.com/read_file_line_by_line_bash/


 You can check the following link to know more about wait command.
 You can check the following link to know more about sleep command.
https://linuxhint.com/sleep_command_linux/
You can check the following link to know more about sleep command.
https://linuxhint.com/sleep_command_linux/
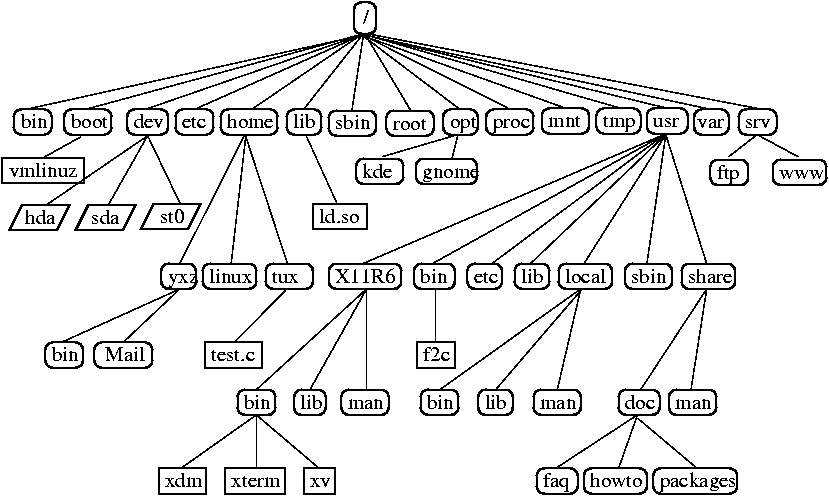
 First Bash Program
To create a bash file, you can use any text editor installed in your operating system.
In this case, we will use the nano editor for creating the file. Let us name our file ‘First.sh’.
Execute the command using the following command:
nano First.sh
Add the following bash script to the file before saving the file.
#!/bin/bash
echo “Hello World”
First Bash Program
To create a bash file, you can use any text editor installed in your operating system.
In this case, we will use the nano editor for creating the file. Let us name our file ‘First.sh’.
Execute the command using the following command:
nano First.sh
Add the following bash script to the file before saving the file.
#!/bin/bash
echo “Hello World”
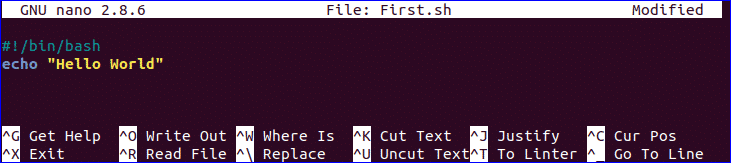
 How to create a bash file
There are different ways of running bash commands.
For instance, below are two distinct examples of executing bash.
./First.sh
Alternatively, you can use execute the command below:
chmod a+x First.sh
./First.sh
How to create a bash file
There are different ways of running bash commands.
For instance, below are two distinct examples of executing bash.
./First.sh
Alternatively, you can use execute the command below:
chmod a+x First.sh
./First.sh
 How to execute Bash
 Echo commands Illustration
 Use of comment
 Multiline comment illustration
 While Loop illustration
 For Loop Illustration
 Get User Input Illustration
 If statement Illustration
 Use of if statement with AND logic illustration.
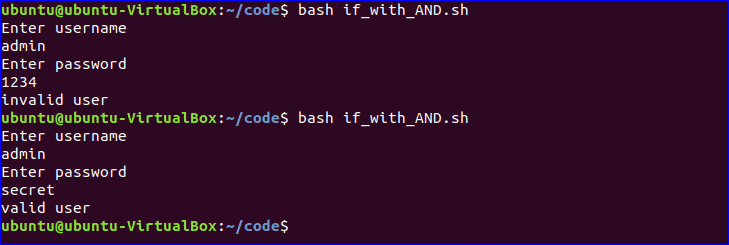
 Use if statement with AND logic Illustration
The first example shows authentication failure since the user-provided does not match with the main fields.
The second examples show successful authentication since the provided fields matched with the main fields.
Use if statement with AND logic Illustration
The first example shows authentication failure since the user-provided does not match with the main fields.
The second examples show successful authentication since the provided fields matched with the main fields.
 Use if statement with OR logic Illustration
As indicated in the example above, 5 is not equal to 10 or 40.
Therefore, the output displays “Sorry, You Failed,”
In the figure above, the user was prompted to enter any number, and he/she chose 10, and the output given is “Well Played” since 10==10
Use if statement with OR logic Illustration
As indicated in the example above, 5 is not equal to 10 or 40.
Therefore, the output displays “Sorry, You Failed,”
In the figure above, the user was prompted to enter any number, and he/she chose 10, and the output given is “Well Played” since 10==10
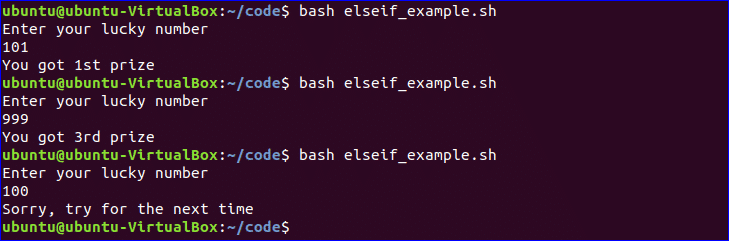
 use of else if statement Illustration
The execution above displays the three instances done by bash.
use of else if statement Illustration
The execution above displays the three instances done by bash.
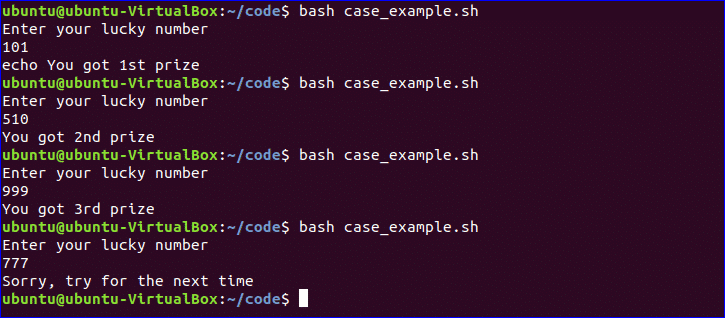
 case statement Illustration
 Obtaining arguments from Command Line Illustration
 Obtain arguments from command-line with names Illustration
 Integrated string variables Illustration
 How to Obtain a substring of string Illustration
 Addition of two numbers Illustration
 function creation Illustration
 Functionality creation with parameters Illustration
 Passing a return a value from a function Illustration
 Make Directory Illustration
 Creation of a directory by checking its existence Illustration
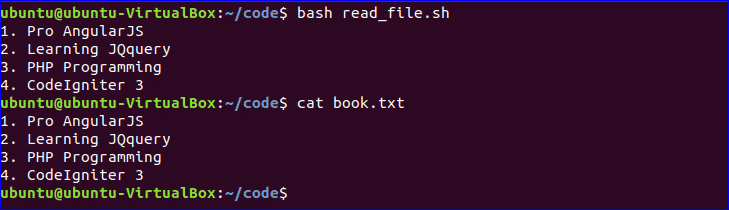
 Reading a file Illustration
To check the original content of languages.txt, run the command below.
cat languages.txt
Reading a file Illustration
To check the original content of languages.txt, run the command below.
cat languages.txt
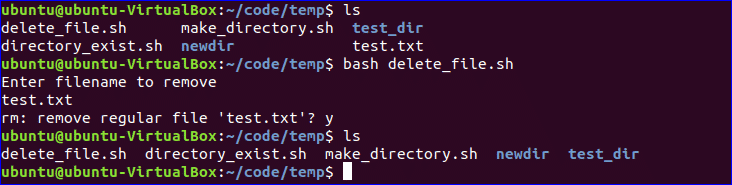
 File Deleting Illustration
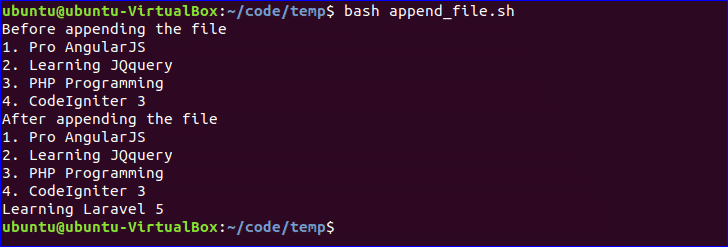
 Append or adding to file Illustration
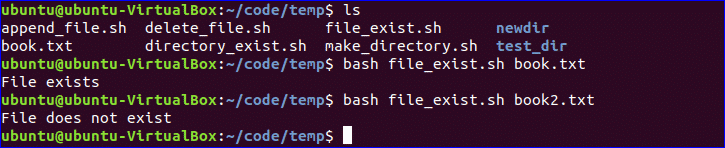
 Test File existence Illustration
These commands are used to check whether a file being looked for exists or not.
For instance, in this example, the languages.txt file exists, while the languages1.txt does not exist.
Test File existence Illustration
These commands are used to check whether a file being looked for exists or not.
For instance, in this example, the languages.txt file exists, while the languages1.txt does not exist.
 Parse Current Date Illustration
 The Wait command Illustration
 The Sleep Command Illustration
 The AND Operator Illustration
 The OR Operator Illustration
 The switch construct Illustration
 Concatenating strings Illustration
 slicing strings Illustration


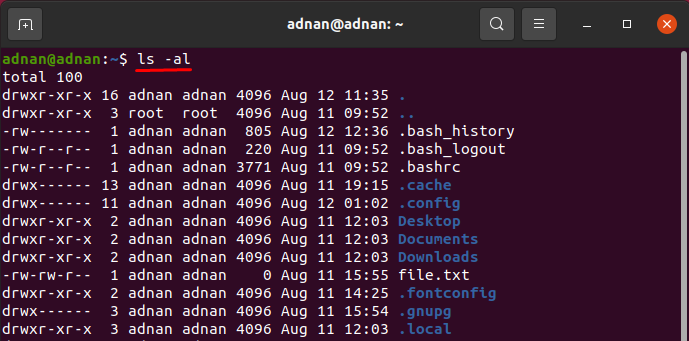
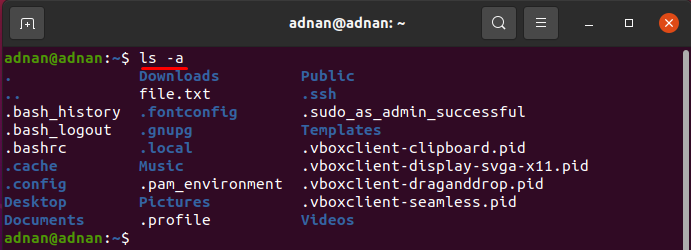
 The ls command supports various flags, and each flag has some specific role in printing the directories or files of the current working directory.
To print the detailed information of the files/directories; the “-al” flag is used with the “ls” command:
$ ls -al
The ls command supports various flags, and each flag has some specific role in printing the directories or files of the current working directory.
To print the detailed information of the files/directories; the “-al” flag is used with the “ls” command:
$ ls -al
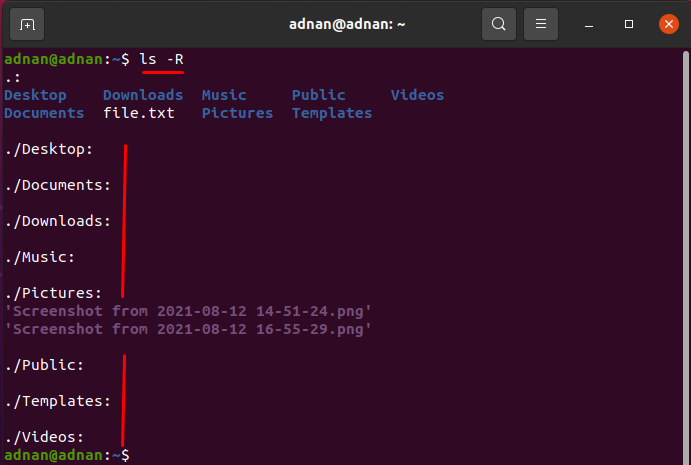
 The “-R” flag will print subdirectories of a directory as well:
$ ls -R
The “-R” flag will print subdirectories of a directory as well:
$ ls -R
 Moreover, to get the hidden files, “-a” flag is used:
$ ls -a
Moreover, to get the hidden files, “-a” flag is used:
$ ls -a
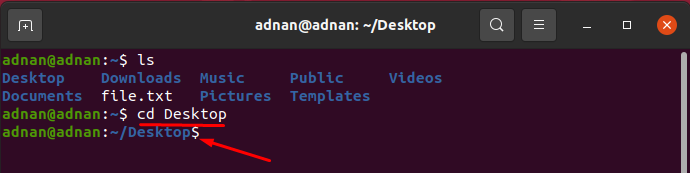 There are multiple uses of this command: one can change the present directory to root directory or home directory using this command.
When you open a fresh terminal, you are in the home directory.
To change directory to root.
For instance, we are in the Desktop directory and want to switch to the root directory:
$ cd /
There are multiple uses of this command: one can change the present directory to root directory or home directory using this command.
When you open a fresh terminal, you are in the home directory.
To change directory to root.
For instance, we are in the Desktop directory and want to switch to the root directory:
$ cd /
 To change the present directory to the home directory:
$ cd
To change the present directory to the home directory:
$ cd

 If we execute a touch command to create a file, but the file is already created, then it would change the timestamp of that file to the current time; for instance, the command given below will change the timestamp of the file1.txt.
you can check that the timestamp has been changed to the current time:
$ touch file1.txt
If we execute a touch command to create a file, but the file is already created, then it would change the timestamp of that file to the current time; for instance, the command given below will change the timestamp of the file1.txt.
you can check that the timestamp has been changed to the current time:
$ touch file1.txt

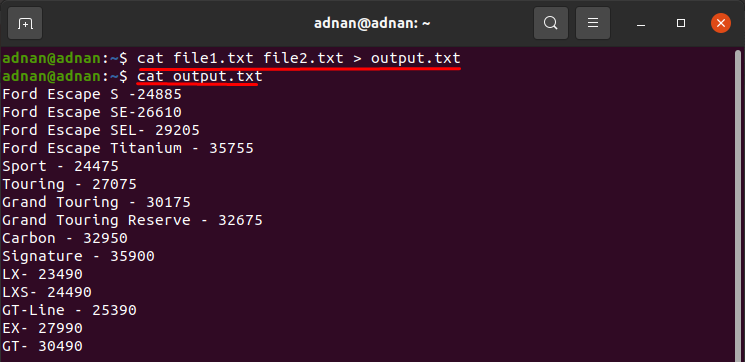
 Or you can use this command to save the content of multiples files to one file:
$ cat file1.txt file2.txt > output.txt
Or you can use this command to save the content of multiples files to one file:
$ cat file1.txt file2.txt > output.txt

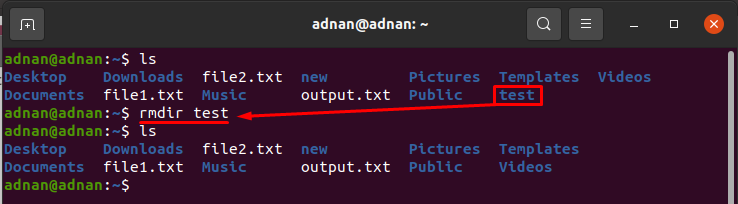
 Or you can remove the empty directory, as the command given below will remove the “test” directory:
$ rmdir test
Or you can remove the empty directory, as the command given below will remove the “test” directory:
$ rmdir test
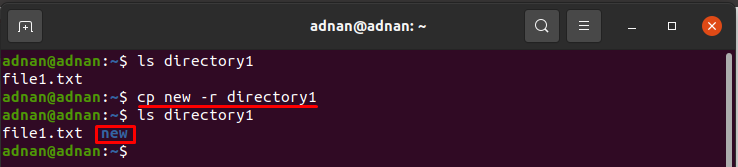
 If you want to copy the complete folder, then;
$ cp new -r directory1
If you want to copy the complete folder, then;
$ cp new -r directory1
 Moreover, the command given below will move the “test1” directory to “directory1”:
$ mv test1 directory1
Moreover, the command given below will move the “test1” directory to “directory1”:
$ mv test1 directory1


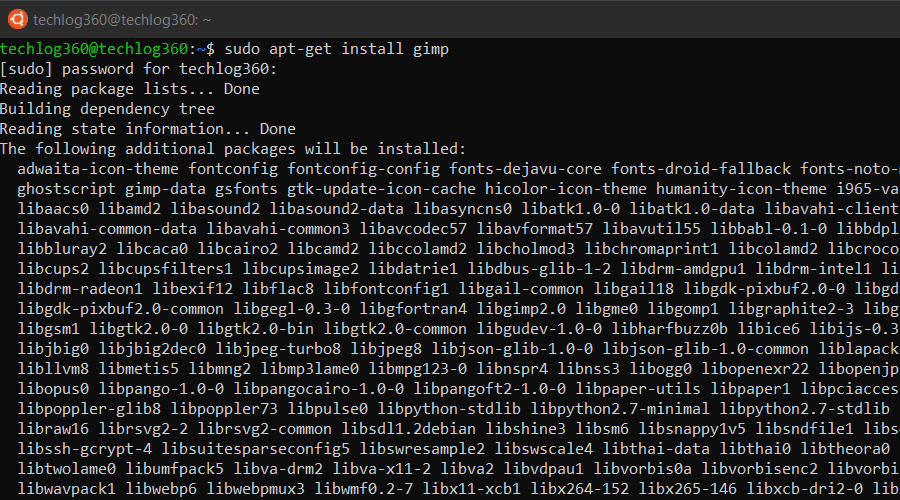
 Or you can remove the package by executing the command given below:
$ sudo apt remove [packagename]
And to delete vlc media player package:
Or you can remove the package by executing the command given below:
$ sudo apt remove [packagename]
And to delete vlc media player package:

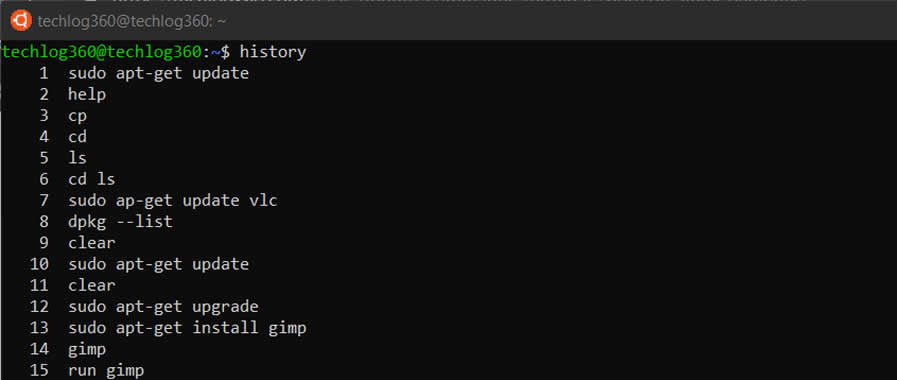
 And you can execute any of the listed commands.
For instance, if you want to execute the 2nd command (which is apt update command), then you have to write “!2” to get the result of that command:
$ !2
And you can execute any of the listed commands.
For instance, if you want to execute the 2nd command (which is apt update command), then you have to write “!2” to get the result of that command:
$ !2


 You can unzip the “file1.txt” as shown below:
$ gunzip file1.txt
You can unzip the “file1.txt” as shown below:
$ gunzip file1.txt


 Or you can delete the user also;
$ sudo userdel MIKE
Or you can delete the user also;
$ sudo userdel MIKE


 If you are not sure about the package name, you can type a few letters and press tab and it will suggest all the packages available with those letters.
Thanks for auto-completion feature.
If you are not sure about the package name, you can type a few letters and press tab and it will suggest all the packages available with those letters.
Thanks for auto-completion feature.
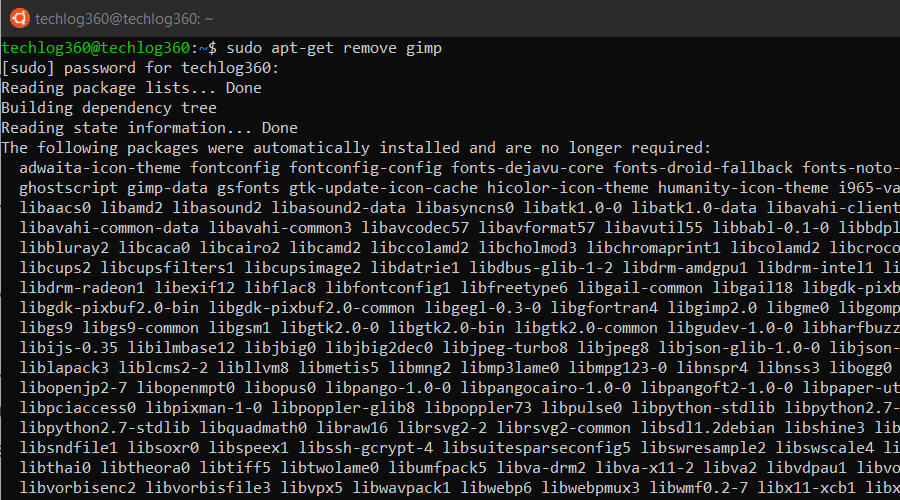 apt-get remove command only removes the software from your system but not the configuration or data files of the package.
These files help in keeping the same settings when you want to reinstall the same software.
apt-get remove command only removes the software from your system but not the configuration or data files of the package.
These files help in keeping the same settings when you want to reinstall the same software.

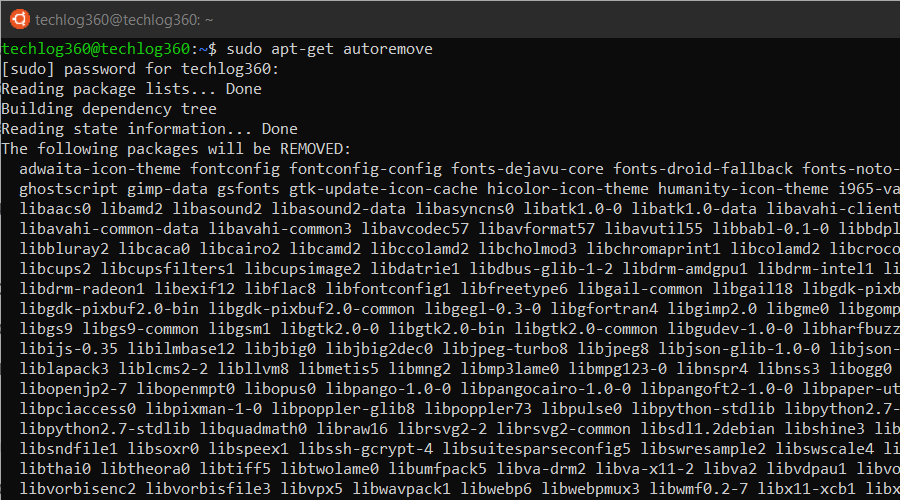 So apt-get autoremove will remove those dependencies that were installed with applications and that are no longer used by anything else on the system.
 Find the "Touch Keyboard and Handwriting Panel Service"
 Open the "Properties" for this service
 Change the "startup type" to "Automatic"
 Hit "Ok", and restart the PC.
After restarting the machine, the service should auto-start, and the dialog should no longer appear.
Hit "Ok", and restart the PC.
After restarting the machine, the service should auto-start, and the dialog should no longer appear.
Why does my mouse pointer disappear when hovering over a window and typing?
This cursor auto-hiding behavior is by design, but can be disabled in the by searching in Windows Settings for "Mouse settings" > "Additional Mouse Settings" > "Mouse Properties" > "Pointer Options" > Uncheck "Hide pointer while typing". You may need to restart your Windows Terminal in order for this change to take effect.To run Linux
From Windows Command Prompt or PowerShell, you can enter the name of your installed distribution. For example: ubuntuBasic vi Commands
What is vi?
To Get Into and Out Of vi
To Start vi
To Exit vi
Moving the Cursor
Screen Manipulation
Adding, Changing, and Deleting Text
Inserting or Adding Text
Changing Text
Deleting Text
Cutting and Pasting Text
Other Commands
Searching Text
Determining Line Numbers
Saving and Reading Files
To Get Into and Out Of vi
To Start vi
To Exit vi
Moving the Cursor
Screen Manipulation
Adding, Changing, and Deleting Text
Inserting or Adding Text
Changing Text
Deleting Text
Cutting and Pasting Text
Other Commands
Searching Text
Determining Line Numbers
Saving and Reading Files
What is vi?
The default editor that comes with the UNIX operating system is called vi (visual editor). [Alternate editors for UNIX environments include pico and emacs, a product of GNU.] The UNIX vi editor is a full screen editor and has two modes of operation: Command mode commands which cause action to be taken on the file, and Insert mode in which entered text is inserted into the file. In the command mode, every character typed is a command that does something to the text file being edited; a character typed in the command mode may even cause the vi editor to enter the insert mode. In the insert mode, every character typed is added to the text in the file; pressing the <Esc> (Escape) key turns off the Insert mode. While there are a number of vi commands, just a handful of these is usually sufficient for beginning vi users. To assist such users, this Web page contains a sampling of basic vi commands. The most basic and useful commands are marked with an asterisk (* or star) in the tables below. With practice, these commands should become automatic. NOTE: Both UNIX and vi are case-sensitive. Be sure not to use a capital letter in place of a lowercase letter; the results will not be what you expect.To Get Into and Out Of vi
To Start vi
To use vi on a file, type in vi filename. If the file named filename exists, then the first page (or screen) of the file will be displayed; if the file does not exist, then an empty file and screen are created into which you may enter text.| * | vi filename | edit filename starting at line 1 |
|---|---|---|
| vi -r filename | recover filename that was being edited when system crashed | |
To Exit vi
Usually the new or modified file is saved when you leave vi. However, it is also possible to quit vi without saving the file. Note: The cursor moves to bottom of screen whenever a colon (:) is typed. This type of command is completed by hitting the <Return> (or <Enter>) key.| * | :x<Return> | quit vi, writing out modified file to file named in original invocation |
|---|---|---|
| :wq<Return> | quit vi, writing out modified file to file named in original invocation | |
| :q<Return> | quit (or exit) vi | |
| * | :q!<Return> | quit vi even though latest changes have not been saved for this vi call |
Moving the Cursor
Unlike many of the PC and MacIntosh editors, the mouse does not move the cursor within the vi editor screen (or window). You must use the the key commands listed below. On some UNIX platforms, the arrow keys may be used as well; however, since vi was designed with the Qwerty keyboard (containing no arrow keys) in mind, the arrow keys sometimes produce strange effects in vi and should be avoided. If you go back and forth between a PC environment and a UNIX environment, you may find that this dissimilarity in methods for cursor movement is the most frustrating difference between the two. In the table below, the symbol ^ before a letter means that the <Ctrl> key should be held down while the letter key is pressed.| * | j or <Return>
[or down-arrow] | move cursor down one line |
|---|---|---|
| * | k [or up-arrow] | move cursor up one line |
| * | h or <Backspace>
[or left-arrow] | move cursor left one character |
| * | l or <Space>
[or right-arrow] | move cursor right one character |
| * | 0 (zero) | move cursor to start of current line (the one with the cursor) |
| * | $ | move cursor to end of current line |
| w | move cursor to beginning of next word | |
| b | move cursor back to beginning of preceding word | |
| :0<Return> or 1G | move cursor to first line in file | |
| :n<Return> or nG | move cursor to line n | |
| :$<Return> or G | move cursor to last line in file | |
Screen Manipulation
The following commands allow the vi editor screen (or window) to move up or down several lines and to be refreshed.| ^f | move forward one screen | |
|---|---|---|
| ^b | move backward one screen | |
| ^d | move down (forward) one half screen | |
| ^u | move up (back) one half screen | |
| ^l | redraws the screen | |
| ^r | redraws the screen, removing deleted lines | |
Adding, Changing, and Deleting Text
Unlike PC editors, you cannot replace or delete text by highlighting it with the mouse. Instead use the commands in the following tables. Perhaps the most important command is the one that allows you to back up and undo your last action. Unfortunately, this command acts like a toggle, undoing and redoing your most recent action. You cannot go back more than one step.| * | u | UNDO WHATEVER YOU JUST DID; a simple toggle |
|---|---|---|
Inserting or Adding Text
The following commands allow you to insert and add text. Each of these commands puts the vi editor into insert mode; thus, the <Esc> key must be pressed to terminate the entry of text and to put the vi editor back into command mode.| * | i | insert text before cursor, until <Esc> hit |
|---|---|---|
| I | insert text at beginning of current line, until <Esc> hit | |
| * | a | append text after cursor, until <Esc> hit |
| A | append text to end of current line, until <Esc> hit | |
| * | o | open and put text in a new line below current line, until <Esc> hit |
| * | O | open and put text in a new line above current line, until <Esc> hit |
Changing Text
The following commands allow you to modify text.| * | r | replace single character under cursor (no <Esc> needed) |
|---|---|---|
| R | replace characters, starting with current cursor position, until <Esc> hit | |
| cw | change the current word with new text,
starting with the character under cursor, until <Esc> hit | |
| cNw | change N words beginning with character under cursor,
until <Esc> hit;
e.g., c5w changes 5 words | |
| C | change (replace) the characters in the current line, until <Esc> hit | |
| cc | change (replace) the entire current line, stopping when <Esc> is hit | |
| Ncc or cNc | change (replace) the next N lines,
starting with the current line, stopping when <Esc> is hit | |
Deleting Text
The following commands allow you to delete text.| * | x | delete single character under cursor |
|---|---|---|
| Nx | delete N characters, starting with character under cursor | |
| dw | delete the single word beginning with character under cursor | |
| dNw | delete N words beginning with character under cursor;
e.g., d5w deletes 5 words | |
| D | delete the remainder of the line, starting with current cursor position | |
| * | dd | delete entire current line |
| Ndd or dNd | delete N lines, beginning with the current line;
e.g., 5dd deletes 5 lines | |
Cutting and Pasting Text
The following commands allow you to copy and paste text.| yy | copy (yank, cut) the current line into the buffer | |
|---|---|---|
| Nyy or yNy | copy (yank, cut) the next N lines, including the current line, into the buffer | |
| p | put (paste) the line(s) in the buffer into the text after the current line | |
Other Commands
Searching Text
A common occurrence in text editing is to replace one word or phase by another. To locate instances of particular sets of characters (or strings), use the following commands.| /string | search forward for occurrence of string in text | |
|---|---|---|
| ?string | search backward for occurrence of string in text | |
| n | move to next occurrence of search string | |
| N | move to next occurrence of search string in opposite direction | |
Determining Line Numbers
Being able to determine the line number of the current line or the total number of lines in the file being edited is sometimes useful.| :.= | returns line number of current line at bottom of screen | |
|---|---|---|
| := | returns the total number of lines at bottom of screen | |
| ^g | provides the current line number, along with the total number of lines, in the file at the bottom of the screen | |
Saving and Reading Files
These commands permit you to input and output files other than the named file with which you are currently working.| :r filename<Return> | read file named filename and insert after current line
(the line with cursor) | |
|---|---|---|
| :w<Return> | write current contents to file named in original vi call | |
| :w newfile<Return> | write current contents to a new file named newfile | |
| :12,35w smallfile<Return> | write the contents of the lines numbered 12 through 35 to a new file named smallfile | |
| :w! prevfile<Return> | write current contents over a pre-existing file named prevfile | |
VI Editing commands
i - Insert at cursor (goes into insert mode) a - Write after cursor (goes into insert mode) A - Write at the end of line (goes into insert mode) ESC - Terminate insert mode u - Undo last change U - Undo all changes to the entire line o - Open a new line (goes into insert mode) dd - Delete line 3dd - Delete 3 lines. D - Delete contents of line after the cursor C - Delete contents of a line after the cursor and insert new text. Press ESC key to end insertion. dw - Delete word 4dw - Delete 4 words cw - Change word x - Delete character at the cursor r - Replace character R - Overwrite characters from cursor onward s - Substitute one character under cursor continue to insert S - Substitute entire line and begin to insert at the beginning of the line ~ - Change case of individual character Note: You should be in the “command mode” to execute these commands. VI editor is case-sensitive so make sure you type the commands in the right letter-case. Make sure you press the right command otherwise you will end up making undesirable changes to the file. You can also enter the insert mode by pressing a, A, o, as required.Moving within a file
k - Move cursor up j - Move cursor down h - Move cursor left l - Move cursor right You need to be in the command mode to move within a file. The default keys for navigation are mentioned below else; You can also use the arrow keys on the keyboard.Saving and Closing the file
Shift+zz - Save the file and quit :w - Save the file but keep it open :q! - Quit vi and do not save changes :wq - Save the file and quit You should be in the command mode to exit the editor and save changes to the file.Bash on Ubuntu on Windows: ls command returns nothing at root level
it probably just means the folder is empty (or only contain hidden files). you can try ls -a (or ll) to see hidden files (including . and ..) and see that it works. How do I access all of my Windows folders from Bash on Ubuntu on Windows Your C drive is at /mnt/c/ dir /mnt/c/ cd ~ usually takes me to my user directory. In bash on windows this takes me to a directory empty except for things like .bashrc. It still takes you to your "home directory" on Windows' Bash, it's just that your home dir starts empty and it's disconnected from your Windows drive. Consider that it's like having a Linux machine with the Windows drive mounted as a secondary or network drive. But if you install Ubuntu stuff that go the "home dir" that will be where cd ~ takes you – if you want to list all directories in root. simply type ls / cd /mnt/c/Users/username Where c means C: drive and username is your Windows username. Then, when you type ls, you will see folders like Desktop, Documents, Downloads, etc.Linux 操作必备 150 个命令
Linux 命令是对 Linux 系统进行管理的命令。 对于 Linux 系统来说,无论是中央处理器、内存、磁盘驱动器、键盘、鼠标,还是用户等都是文件, Linux 系统管理的命令是它正常运行的核心,与之前的 DOS 命令类似。 Linux 命令在系统中有两种类型: 内置 Shell 命令和 Linux 命令。 命令 功能说明 线上查询及帮助命令 (2 个) man 查看命令帮助,命令的词典,更复杂的还有 info,但不常用。 help 查看 Linux 内置命令的帮助,比如 cd 命令。 文件和目录操作命令 (18 个) ls 全拼 list,功能是列出目录的内容及其内容属性信息。 cd 全拼 change directory,功能是从当前工作目录切换到指定的工作目录。 cp 全拼 copy,其功能为复制文件或目录。 find 查找的意思,用于查找目录及目录下的文件。 mkdir 全拼 make directories,其功能是创建目录。 mv 全拼 move,其功能是移动或重命名文件。 pwd 全拼 print working directory,其功能是显示当前工作目录的绝对路径。 rename 用于重命名文件。 rm 全拼 remove,其功能是删除一个或多个文件或目录。 rmdir 全拼 remove empty directories,功能是删除空目录。 touch 创建新的空文件,改变已有文件的时间戳属性。 tree 功能是以树形结构显示目录下的内容。 basename 显示文件名或目录名。 dirname 显示文件或目录路径。 chattr 改变文件的扩展属性。 lsattr 查看文件扩展属性。 file 显示文件的类型。 md5sum 计算和校验文件的 MD5 值。 查看文件及内容处理命令(21 个) cat 全拼 concatenate,功能是用于连接多个文件并且打印到屏幕输出或重定向到指定文件中。 tac tac 是 cat 的反向拼写,因此命令的功能为反向显示文件内容。 more 分页显示文件内容。 less 分页显示文件内容,more 命令的相反用法。 head 显示文件内容的头部。 tail 显示文件内容的尾部。 cut 将文件的每一行按指定分隔符分割并输出。 split 分割文件为不同的小片段。 paste 按行合并文件内容。 sort 对文件的文本内容排序。 uniq 去除重复行。 oldboy wc 统计文件的行数、单词数或字节数。 iconv 转换文件的编码格式。 dos2unix 将 DOS 格式文件转换成 UNIX 格式。 diff 全拼 difference,比较文件的差异,常用于文本文件。 vimdiff 命令行可视化文件比较工具,常用于文本文件。 rev 反向输出文件内容。 grep/egrep 过滤字符串,三剑客老三。 join 按两个文件的相同字段合并。 tr 替换或删除字符。 vi/vim 命令行文本编辑器。 文件压缩及解压缩命令(4 个) tar 打包压缩。 oldboy unzip 解压文件。 gzip gzip 压缩工具。 zip 压缩工具。 信息显示命令(11 个) uname 显示操作系统相关信息的命令。 hostname 显示或者设置当前系统的主机名。 dmesg 显示开机信息,用于诊断系统故障。 uptime 显示系统运行时间及负载。 stat 显示文件或文件系统的状态。 du 计算磁盘空间使用情况。 df 报告文件系统磁盘空间的使用情况。 top 实时显示系统资源使用情况。 free 查看系统内存。 date 显示与设置系统时间。 cal 查看日历等时间信息。 搜索文件命令(4 个) which 查找二进制命令,按环境变量 PATH 路径查找。 find 从磁盘遍历查找文件或目录。 whereis 查找二进制命令,按环境变量 PATH 路径查找。 locate 从数据库 (/var/lib/mlocate/mlocate.db) 查找命令,使用 updatedb 更新库。 用户管理命令(10 个) useradd 添加用户。 usermod 修改系统已经存在的用户属性。 userdel 删除用户。 groupadd 添加用户组。 passwd 修改用户密码。 chage 修改用户密码有效期限。 id 查看用户的 uid,gid 及归属的用户组。 su 切换用户身份。 visudo 编辑 / etc/sudoers 文件的专属命令。 sudo 以另外一个用户身份(默认 root 用户)执行事先在 sudoers 文件允许的命令。 基础网络操作命令(11 个) telnet 使用 TELNET 协议远程登录。 ssh 使用 SSH 加密协议远程登录。 scp 全拼 secure copy,用于不同主机之间复制文件。 wget 命令行下载文件。 ping 测试主机之间网络的连通性。 route 显示和设置 linux 系统的路由表。 ifconfig 查看、配置、启用或禁用网络接口的命令。 ifup 启动网卡。 ifdown 关闭网卡。 netstat 查看网络状态。 ss 查看网络状态。 深入网络操作命令(9 个) nmap 网络扫描命令。 lsof 全名 list open files,也就是列举系统中已经被打开的文件。 mail 发送和接收邮件。 mutt 邮件管理命令。 nslookup 交互式查询互联网 DNS 服务器的命令。 dig 查找 DNS 解析过程。 host 查询 DNS 的命令。 traceroute 追踪数据传输路由状况。 tcpdump 命令行的抓包工具。 有关磁盘与文件系统的命令(16 个) mount 挂载文件系统。 umount 卸载文件系统。 fsck 检查并修复 Linux 文件系统。 dd 转换或复制文件。 dumpe2fs 导出 ext2/ext3/ext4 文件系统信息。 dump ext2/3/4 文件系统备份工具。 fdisk 磁盘分区命令,适用于 2TB 以下磁盘分区。 parted 磁盘分区命令,没有磁盘大小限制,常用于 2TB 以下磁盘分区。 mkfs 格式化创建 Linux 文件系统。 partprobe 更新内核的硬盘分区表信息。 e2fsck 检查 ext2/ext3/ext4 类型文件系统。 mkswap 创建 Linux 交换分区。 swapon 启用交换分区。 swapoff 关闭交换分区。 sync 将内存缓冲区内的数据写入磁盘。 resize2fs 调整 ext2/ext3/ext4 文件系统大小。 系统权限及用户授权相关命令(4 个) chmod 改变文件或目录权限。 chown 改变文件或目录的属主和属组。 chgrp 更改文件用户组。 umask 显示或设置权限掩码。 查看系统用户登陆信息的命令(7 个) whoami 显示当前有效的用户名称,相当于执行 id -un 命令。 who 显示目前登录系统的用户信息。 w 显示已经登陆系统的用户列表,并显示用户正在执行的指令。 last 显示登入系统的用户。 lastlog 显示系统中所有用户最近一次登录信息。 users 显示当前登录系统的所有用户的用户列表。 finger 查找并显示用户信息。 内置命令及其它(19 个) echo 打印变量,或直接输出指定的字符串 printf 将结果格式化输出到标准输出。 rpm 管理 rpm 包的命令。 yum 自动化简单化地管理 rpm 包的命令。 watch 周期性的执行给定的命令,并将命令的输出以全屏方式显示。 alias 设置系统别名。 unalias 取消系统别名。 date 查看或设置系统时间。 clear 清除屏幕,简称清屏。 history 查看命令执行的历史纪录。 eject 弹出光驱。 time 计算命令执行时间。 nc 功能强大的网络工具。 xargs 将标准输入转换成命令行参数。 exec 调用并执行指令的命令。 export 设置或者显示环境变量。 unset 删除变量或函数。 type 用于判断另外一个命令是否是内置命令。 bc 命令行科学计算器 系统管理与性能监视命令 (9 个) chkconfig 管理 Linux 系统开机启动项。 vmstat 虚拟内存统计。 mpstat 显示各个可用 CPU 的状态统计。 iostat 统计系统 IO。 sar 全面地获取系统的 CPU、运行队列、磁盘 I/O、分页(交换区)、内存、 CPU 中断和网络等性能数据。 ipcs 用于报告 Linux 中进程间通信设施的状态,显示的信息包括消息列表、共享内存和信号量的信息。 ipcrm 用来删除一个或更多的消息队列、信号量集或者共享内存标识。 strace 用于诊断、调试 Linux 用户空间跟踪器。 我们用它来监控用户空间进程和内核的交互,比如系统调用、信号传递、进程状态变更等。 ltrace 命令会跟踪进程的库函数调用, 它会显现出哪个库函数被调用。 关机 / 重启 / 注销和查看系统信息的命令(6 个) shutdown 关机。 halt 关机。 poweroff 关闭电源。 logout 退出当前登录的 Shell。 exit 退出当前登录的 Shell。 Ctrl+d 退出当前登录的 Shell 的快捷键。 进程管理相关命令(15 个) bg 将一个在后台暂停的命令,变成继续执行 (在后台执行)。 fg 将后台中的命令调至前台继续运行。 jobs 查看当前有多少在后台运行的命令。 kill 终止进程。 killall 通过进程名终止进程。 pkill 通过进程名终止进程。 crontab 定时任务命令。 ps 显示进程的快照。 pstree 树形显示进程。 nice/renice 调整程序运行的优先级。 nohup 忽略挂起信号运行指定的命令。 pgrep 查找匹配条件的进程。 runlevel 查看系统当前运行级别。 init 切换运行级别。 service 启动、停止、重新启动和关闭系统服务,还可以显示所有系统服务的当前状态。Variable Names
The name of a variable can contain only letters (a to z or A to Z), numbers ( 0 to 9) or the underscore character ( _). By convention, Unix shell variables will have their names in UPPERCASE. The following examples are valid variable names - _ALI TOKEN_A VAR_1 VAR_2 Following are the examples of invalid variable names - 2_VAR -VARIABLE VAR1-VAR2 VAR_A! The reason you cannot use other characters such as !, *, or - is that these characters have a special meaning for the shell.Defining Variables
Variables are defined as follows - variable_name=variable_value For example - NAME="Zara Ali" The above example defines the variable NAME and assigns the value "Zara Ali" to it. Variables of this type are called scalar variables. A scalar variable can hold only one value at a time. Shell enables you to store any value you want in a variable. For example - VAR1="Zara Ali" VAR2=100Accessing Values
To access the value stored in a variable, prefix its name with the dollar sign ($) - For example, the following script will access the value of defined variable NAME and print it on STDOUT - #!/bin/sh NAME="Zara Ali" echo $NAME The above script will produce the following value - Zara AliRead-only Variables
Shell provides a way to mark variables as read-only by using the read-only command. After a variable is marked read-only, its value cannot be changed. For example, the following script generates an error while trying to change the value of NAME - #!/bin/sh NAME="Zara Ali" readonly NAME NAME="Qadiri" The above script will generate the following result - /bin/sh: NAME: This variable is read only.Unsetting Variables
Unsetting or deleting a variable directs the shell to remove the variable from the list of variables that it tracks. Once you unset a variable, you cannot access the stored value in the variable. Following is the syntax to unset a defined variable using the unset command - unset variable_name The above command unsets the value of a defined variable. Here is a simple example that demonstrates how the command works - #!/bin/sh NAME="Zara Ali" unset NAME echo $NAME The above example does not print anything. You cannot use the unset command to unset variables that are marked readonly.Variable Types
When a shell is running, three main types of variables are present - Local Variables - A local variable is a variable that is present within the current instance of the shell. It is not available to programs that are started by the shell. They are set at the command prompt. Environment Variables - An environment variable is available to any child process of the shell. Some programs need environment variables in order to function correctly. Usually, a shell script defines only those environment variables that are needed by the programs that it runs. Shell Variables - A shell variable is a special variable that is set by the shell and is required by the shell in order to function correctly. Some of these variables are environment variables whereas others are local variables.Variables in Shell Scripting
In every programming language variables plays an important role , in Linux shell scripting we can use two types of variables : System Defined Variables & User Defined Variables. A variable in a shell script is a means of referencing a numeric or character value. And unlike formal programming languages, a shell script doesn’t require you to declare a type for your variables
System Defined Variables
These are the variables which are created and maintained by Operating System(Linux) itself. Generally these variables are defined in CAPITAL LETTERS. We can see these variables by using the command “$ set“. Some of the system defined variables are given below : $ set To print the value of above variables, use echo command as shown below :
$ echo $HOME
/home/linuxtechi
$ echo $USER
linuxtechi
$
We can use environment variables in our bash scripts by using the environment variable’s name preceded by a dollar sign.
Example is shown below,
$ cat myscript
#!/bin/bash
# display user information from the system.
echo "User info for userid: $USER"
echo UID: $UID
echo HOME: $HOME
Notice that the environment variables in the echo commands are replaced by their current values when the script is run.
Also notice that we were able to place the $USER system variable within the double quotation marks in the first string, and the shell script was still able to figure out what we meant.
There is a drawback to using this method, however.
Look at what happens in this example:
$ echo "The cost of the item is $15"
The cost of the item is 5
$
That is obviously not what was intended.
Whenever the script sees a dollar sign within quotes, it assumes you’re referencing a variable.
In this example the script attempted to display the variable $1 (which was not defined), and then the number 5.
To display an actual dollar sign, you must precede it with a backslash character:
$ echo "The cost of the item is \$15"
The cost of the item is $15
$
That’s better.
The backslash allowed the shell script to interpret the dollar sign as an actual dollar sign, and not a variable.
To print the value of above variables, use echo command as shown below :
$ echo $HOME
/home/linuxtechi
$ echo $USER
linuxtechi
$
We can use environment variables in our bash scripts by using the environment variable’s name preceded by a dollar sign.
Example is shown below,
$ cat myscript
#!/bin/bash
# display user information from the system.
echo "User info for userid: $USER"
echo UID: $UID
echo HOME: $HOME
Notice that the environment variables in the echo commands are replaced by their current values when the script is run.
Also notice that we were able to place the $USER system variable within the double quotation marks in the first string, and the shell script was still able to figure out what we meant.
There is a drawback to using this method, however.
Look at what happens in this example:
$ echo "The cost of the item is $15"
The cost of the item is 5
$
That is obviously not what was intended.
Whenever the script sees a dollar sign within quotes, it assumes you’re referencing a variable.
In this example the script attempted to display the variable $1 (which was not defined), and then the number 5.
To display an actual dollar sign, you must precede it with a backslash character:
$ echo "The cost of the item is \$15"
The cost of the item is $15
$
That’s better.
The backslash allowed the shell script to interpret the dollar sign as an actual dollar sign, and not a variable.
User Defined Variables
These variables are defined by users. A shell script allows us to set and use our own variables within the script. Setting variables allows you to temporarily store data and use it throughout the script, making the shell script more like a real computer program. User variables can be any text string of up to 20 letters, digits, or an underscore character. User variables are case sensitive, so the variable Var1 is different from the variable var1. This little rule often gets novice script programmers in trouble. Values are assigned to user variables using an equal sign. No spaces can appear between the variable, the equal sign, and the value (another trouble spot for novices). Here are a few examples of assigning values to user variables: var1=10 var2=-57 var3=testing var4="still more testing" The shell script automatically determines the data type used for the variable value. Variables defined within the shell script maintain their values throughout the life of the shell script but are deleted when the shell script completes. Just like system variables, user variables can be referenced using the dollar sign: $ cat test3 #!/bin/bash # testing variables days=10 guest="Katie" echo "$guest checked in $days days ago" days=5 guest="Jessica" echo "$guest checked in $days days ago" $ Running the script produces the following output, $ chmod u+x test3 $ ./test3 Katie checked in 10 days ago Jessica checked in 5 days ago $ Each time the variable is referenced, it produces the value currently assigned to it. It’s important to remember that when referencing a variable value you use the dollar sign, but when referencing the variable to assign a value to it, you do not use the dollar sign. Here’s an example of what I mean: $ cat test4 #!/bin/bash # assigning a variable value to another variable value1=10 value2=$value1 echo The resulting value is $value2 $ When you use the value of the value1 variable in the assignment statement, you must still use the dollar sign. This code produces the following output: $ chmod u+x test4 $ ./test4 The resulting value is 10 $ If you forget the dollar sign, and make the value2 assignment line look like: value2=value1 you get the following output: $ ./test4 The resulting value is value1 $ Without the dollar sign the shell interprets the variable name as a normal text string, which is most likely not what you wanted.Use of Backtick symbol (`) in shell variables
The backtick allows you to assign the output of a shell command to a variable. While this doesn’t seem like much, it is a major building block in script programming. You must surround the entire command line command with backtick characters: testing=`date` The shell runs the command within the backticks and assigns the output to the variable testing. Here’s an example of creating a variable using the output from a normal shell command: $ cat test5 #!/bin/bash # using the backtick character testing=`date` echo "The date and time are: " $testing $ The variable testing receives the output from the date command, and it is used in the echo statement to display it. Running the shell script produces the following output: $ chmod u+x test5 $ ./test5 The date and time are: Tue 4 Oct 05:20:44 BST 2022 $ Note : In bash you can also use the alternative $(…) syntax in place of backtick (`),which has the advantage of being re-entrant. Example : $ echo " Today’s date & time is :" $(date) Today’s date & time is : Tue 4 Oct 05:21:51 BST 2022 $Reset password for Ubuntu on WSL
Step 1: Switch to root as default user From the command prompt: ubuntu config --default-user root Step 2: Reset the password for the account whoami passwd rootfix a "Command not found" error in Linux
Understanding environment variables
Global variables
Local variables
The PATH environment variable
5 ways to fix "Command not found" errors
1. Include the path
2. Add a new path
3. Copy a file to an existing path location
4. Tell Bash where to look
5. Install a package
Stick to the path
Global variables
Local variables
The PATH environment variable
5 ways to fix "Command not found" errors
1. Include the path
2. Add a new path
3. Copy a file to an existing path location
4. Tell Bash where to look
5. Install a package
Stick to the path
When you're trying to run a command (with or without
sudo) and get an error message that reads "Command not found," this means the script or file you're trying to execute doesn't exist in the location specified by your PATH variable.
What is this variable, and how can you run commands that it can't find?
Understanding environment variables
In computing, a variable is a placeholder for a value that can change. You use variables every day in normal speech, although you don't think of them as such. When you say "my laptop," you're using "laptop" as a generic variable or placeholder for the computer you're carrying, regardless of whether it happens to be a Lenovo, Mac, or a Raspberry Pi in a fancy case. Environment variables are special variables that contain information about your login session. Many of these variables are set by default during installation or user creation. They're stored for the system shell, applications, and scripts to use when executing commands. There are global, or system-defined, variables and local, or user-defined, variables.Global variables
Global variables come predefined in your login shell, but they aren't immutable and can be modified or deleted according to your preferences. You can use theprintenv or env commands to display the environment variables on your system:
$ env
SHELL=/bin/bash
SESSION_MANAGER=local/kiwi.homelinux.local:@/tmp/.ICE-unix/1906,unix/kiwi.homelinux.local:/tmp/.ICE-unix/19
06
WINDOWID=153092103
COLORTERM=truecolor
XDG_CONFIG_DIRS=/home/tux/.config/kdedefaults:/etc/xdg:/etc/kde/xdg
LESS=-XR
XDG_SESSION_PATH=/org/freedesktop/DisplayManager/Session1
HISTCONTROL=:ignorespace:ignoredups:ignorespace:ignoredups
PKG_CONFIG_PATH=/usr/local/lib64/pkgconfig:/usr/local/share/pkgconfig:/usr/lib64/pkgconfig:/usr/share/pkgconfig
[...]
The env command prints out all global environment variables.
Variables are case sensitive, and all Linux distributions use uppercase for environment variable names by default.
[ Keep your favorite Git commands, aliases, and tips close at hand.
Download the Git cheat sheet.
]
Local variables
A local variable exists only within a specific shell. Therefore, when you define a local variable, it's only available in your current shell. It doesn't propagate or persist to a new shell session unless you export it as a global variable. Local variables are often defined in lowercase to avoid overwriting a global variable with the same name.The PATH environment variable
The PATH global environment variable lists the directories your system searches for valid, executable commands. By default, it contains standard directories that normally store executables like/usr/bin, /usr/local/bin, and so on.
When you type in a command, such as grep or vim, your system searches through all directories listed in your PATH variable, in the order that they're listed, until it finds an executable file by the same name.
Should it fail to find one, it issues the "Command not found" error.
$ printenv PATH
/usr/local/bin:/usr/bin:/usr/local/sbin:/usr/sbin:/home/tux/.local/bin:/home/tux/bin

$ env $PATH
env: /usr/local/bin:/usr/bin:/usr/local/sbin:/usr/sbin:/home/tux/.local/bin:/home/tux/bin
5 ways to fix "Command not found" errors
There are several ways to fix this problem. Here are five of them.1. Include the path
Not everything you want to execute needs to be in your path. You can execute files directly by specifying the path to the file you want to run. By identifying the file's location, you circumvent the need for your system to search your path at all. For example, suppose you have a script calledhello that you want to run.
It's located in your home directory, and you have already marked it as executable with chmod +x:
$ ~/hello
hello world
By telling your system the file's location, the PATH variable is never involved, and the file runs as expected.
2. Add a new path
Alternately, you can add a new directory to your PATH. Add your executable files to that directory, and then you can run them without manually providing a path:$ cp ~/hello ~/.local/bin
$ export PATH=$PATH:$HOME/.local/bin
$ printenv PATH
/usr/local/bin:/usr/bin:/usr/local/sbin:/usr/sbin:/home/tux/.local/bin
You may want to add the new PATH environment variables to your login shell by including them in your .bashrc file as new settings.
3. Copy a file to an existing path location
If you want to execute your binary file or script, copy it to any of the directory paths already listed in the PATH environment variable:$ sudo cp ~/hello /usr/local/bin/
$ hello
hello world
4. Tell Bash where to look
Probably the simplest option, especially for one-off scripts or applications, is to tell Bash not to consider the PATH but rather to "look here." Do this by placing a dot and a slash in front of the command, script, or application name. For thehello script, it looks like this:
$ sudo ./hello
hello world
No permanent changes are made to the system.
This might be handy if you're writing a script and want to test it before copying or moving it to its normal storage location (presumably along the PATH).
5. Install a package
Sometimes when you try to use a command and Bash displays the "Command not found" error, it might be because the program is not installed on your system. Correct this by installing a software package containing the command. For example, if you don't have Nmap installed, then thenmap command fails when you type it into a terminal:
$ nmap
nmap: command not found
$ sudo dnf install --assumeyes --quiet nmap
$ nmap
Nmap 7.92 ( https://nmap.org )
Usage: nmap [Scan Type(s)] [Options] {target specification}
[...]
[ Want to learn more? Sign up for a free trial of full access to Red Hat's curriculum.
]
Stick to the path
The PATH variable is a powerful tool you can use to customize how your system responds to commands, so take some time to get comfortable with it. It's frequently used when running commands to find the command executable. In this tutorial, you learned five ways to fix a "Command not found" error in your terminal—three of which rely on the PATH variable. Now that you know what variables are and how command executables are found, you won't be so mystified when the "Command not found" error appears on your screen.Linux 系统总结
Linux 基础
操作系统
什么是 Linux
Linux 系统内核与 Linux 发行套件的区别
Linux 对比 Windows
Linux 系统种类
终端连接阿里云服务器
Shell
Shell 的种类
命令
命令行提示符
命令格式
长短参数
参数值
快捷方式
文件和目录
文件的组织
查看路径
pwd
which
浏览和切换目录
ls
cd
du
浏览和创建文件
cat
less
head
tail
touch
mkdir
文件的复制和移动
cp
mv
文件的删除和链接
rm
ln
用户与权限
用户
sudo
useradd + passwd
userdel
su
群组的管理
groupadd
groupdel
groups
usermod
chgrp
chown
文件权限管理
chmod
查找文件
locate
安装 locate
find
根据文件名查找
根据文件大小查找
根据文件最近访问时间查找
仅查找目录或文件
操作查找结果
软件仓库
yum 常用命令
切换 CentOS 软件源
阅读手册
man
安装更新 man
man 手册种类
man + 数字 + 命令
help
Linux 进阶
文本操作
grep
基础语法
常用参数
高级用法
sort
基础语法
实例用法
常用参数
wc
基础语法
实例用法
常用参数
uniq
基础语法
常用参数
cut
基础语法
常用参数
重定向 管道 流
重定向
输出重定向
输出重定向
输出重定向
输出重定向
输出重定向
输入重定向
输入重定向
管道
流
查看进程
w
ps
基础语法
常用参数
top
kill
管理进程
进程状态
前台进程 & 后台进程
&
nohup
bg
jobs
fg
守护进程
systemd
文件压缩解压
tar
基础用法
常用参数
gzip / gunzip
tar 归档+压缩
zcat、zless、zmore
zip/unzip
命令安装
基础用法
编译安装软件
编译安装
实际案例
网络
ifconfig
host
软件安装
基础用法
ssh 连接远程服务器
配置 ssh
免密登录
wget
常用参数
备份
scp
rsync
软件安装
基础用法
常用参数
系统
halt
reboot
poweroff
Vim 编辑器
Vim 是什么?
Vim 常用模式
交互模式
插入模式
命令模式
基本操作
打开 Vim
插入
移动
跳至行首和行末
按单词移动
退出文件
标准操作
删除字符
删除(剪切)单词,行
复制单词,行
粘贴
替换一个字符
撤销操作
重做
跳转到指定行
高级操作
查找
查找并替换
合并文件
分屏
分屏模式下的快捷键
运行外部命令
可视模式
Vim 配置
选项参数
.vimrc
长短参数
参数值
pwd
which
ls
cd
du
cat
less
head
tail
touch
mkdir
cp
mv
rm
ln
sudo
useradd + passwd
userdel
su
groupadd
groupdel
groups
usermod
chgrp
chown
chmod
安装 locate
根据文件名查找
根据文件大小查找
根据文件最近访问时间查找
仅查找目录或文件
操作查找结果
安装更新 man
man 手册种类
man + 数字 + 命令
Linux 进阶
基础语法
常用参数
高级用法
基础语法
实例用法
常用参数
基础语法
实例用法
常用参数
基础语法
常用参数
基础语法
常用参数
输出重定向
> 输出重定向
>> 输出重定向
2> 输出重定向
2>> 输出重定向
2>&1 输入重定向
< 输入重定向
<< | 基础语法
常用参数
基础用法
常用参数
命令安装
基础用法
实际案例
软件安装
基础用法
配置 ssh
免密登录
常用参数
软件安装
基础用法
常用参数
Vim 编辑器
分屏模式下的快捷键
:!前言 Linux 的学习对于一个程序员的重要性是不言而喻的。前端开发相比后端开发,接触
Linux 机会相对较少,因此往往容易忽视它。但是学好它却是程序员必备修养之一。
如果本文对你有所帮助,请点个👍 吧。
作者使用的是阿里云服务器 ECS (最便宜的那种) CentOS 7.7 64位。当然你也可以在自己的电脑安装虚拟机,虚拟机中再去安装 CentOS 系统(这就完全免费了)。至于它的安装教程可以去谷歌搜索下,相关教程非常多。
Linux 基础
操作系统
操作系统 Operating System 简称 OS ,是软件的一部分,它是硬件基础上的第一层软件,是硬件和其它软件沟通的桥梁。
操作系统会控制其他程序运行,管理系统资源,提供最基本的计算功能,如管理及配置内存、决定系统资源供需的优先次序等,同时还提供一些基本的服务程序。
什么是 Linux
Linux 系统内核与 Linux 发行套件的区别
Linux 系统内核指的是由 Linus Torvalds 负责维护,提供硬件抽象层、硬盘及文件系统控制及多任务功能的系统核心程序。
Linux 发行套件系统是我们常说的 Linux 操作系统,也即是由 Linux 内核与各种常用软件的集合产品。
Linux 指的是系统内核,而我们常说的 Linux 指的是“发行版完整的包含一些基础软件的操作系统”。 Linux 对比 Windows
稳定且有效率;
免费(或少许费用);
漏洞少且快速修补;
多任务多用户;
更加安全的用户与文件权限策略;
适合小内核程序的嵌入系统;
相对不耗资源。
Linux 系统种类
红帽企业版 Linux : RHEL 是全世界内使用最广泛的 Linux 系统。它具有极强的性能与稳定性,是众多生成环境中使用的(收费的)系统。
Fedora :由红帽公司发布的桌面版系统套件,用户可以免费体验到最新的技术或工具,这些技术或工具在成熟后会被加入到 RHEL 系统中,因此 Fedora 也成为 RHEL 系统的试验版本。
CentOS :通过把 RHEL 系统重新编译并发布给用户免费使用的 Linux 系统,具有广泛的使用人群。
Deepin :中国发行,对优秀的开源成品进行集成和配置。
Debian :稳定性、安全性强,提供了免费的基础支持,在国外拥有很高的认可度和使用率。
Ubuntu :是一款派生自 Debian 的操作系统,对新款硬件具有极强的兼容能力。 Ubuntu 与 Fedora 都是极其出色的 Linux 桌面系统,而且 Ubuntu 也可用于服务器领域。
终端连接阿里云服务器
ssh root@121.42.11.34 命令,然后输入服务器连接密码就可以顺利登陆远程服务器。从现在开始我们就可以在本地电脑操作远程服务器。
这个黑色的面板就是终端也就是 Shell (命令行环境)。
ssh root@xxx 这是一条命令,必须要在 Shell 中才能执行。
Shell
Shell 这个单词的原意是“外壳”,跟 kernel(内核)相对应,比喻内核外面的一层,即用户跟内核交互的对话界面。
Shell 是一个程序,提供一个与用户对话的环境。这个环境只有一个命令提示符,让用户从键盘输入命令,所以又称为命令行环境( command line interface ,简写为 CLI )。 Shell 接收到用户输入的命令,将命令送入操作系统执行,并将结果返回给用户。
Shell 是一个命令解释器,解释用户输入的命令。它支持变量、条件判断、循环操作等语法,所以用户可以用 Shell 命令写出各种小程序,又称为 Shell 脚本。这些脚本都通过 Shell 的解释执行,而不通过编译。
Shell 是一个工具箱,提供了各种小工具,供用户方便地使用操作系统的功能。
Shell 的种类
Shell 有很多种,只要能给用户提供命令行环境的程序,都可以看作是 Shell 。
历史上,主要的 Shell 有下面这些:
Bourne Shell(sh)
Bourne Again shell(bash)
C Shell(csh)
TENEX C Shell(tcsh)
Korn shell(ksh)
Z Shell(zsh)
Friendly Interactive Shell(fish)
其中 Bash 是目前最常用的 Shell 。 MacOS 中的默认 Shell 就是 Bash 。
通过执行 echo $SHELL 命令可以查看到当前正在使用的 Shell 。还可以通过 cat /etc/shells 查看当前系统安装的所有 Shell 种类。
命令
命令行提示符
进入命令行环境以后,用户会看到 Shell 的提示符。提示符往往是一串前缀,最后以一个美元符号 $ 结尾,用户可以在这个符号后面输入各种命令。
执行一个简单的命令 pwd :
[root@iZm5e8dsxce9ufaic7hi3uZ ~]# pwd
/root
命令解析:
root:表示用户名;
iZm5e8dsxce9ufaic7hi3uZ:表示主机名;
~:表示目前所在目录为家目录,其中 root 用户的家目录是 /root 普通用户的家目录在 /home 下;
#:指示你所具有的权限( root 用户为 # ,普通用户为 $ )。
执行 whoami 命令可以查看当前用户名;
执行 hostname 命令可以查看当前主机名;
关于如何创建、切换、删除用户,在后面的用户与权限会具体讲解,这里先使用 root 用户进行演示。
[备注] root 是超级用户,具备操作系统的一切权限。
命令格式
command parameters(命令 参数)
长短参数
单个参数:ls -a(a 是英文 all 的缩写,表示“全部”)
多个参数:ls -al(全部文件 + 列表形式展示)
单个长参数:ls --all
多个长参数:ls --reverse --all
长短混合参数:ls --all -l
参数值
短参数:command -p 10(例如:ssh root@121.42.11.34 -p 22)
长参数:command --paramters=10(例如:ssh root@121.42.11.34 --port=22)
快捷方式
在开始学习 Linux 命令之前,有这么一些快捷方式,是必须要提前掌握的,它将贯穿整个 Linux 使用生涯。
通过上下方向键 ↑ ↓ 来调取过往执行过的 Linux 命令;
命令或参数仅需输入前几位就可以用 Tab 键补全;
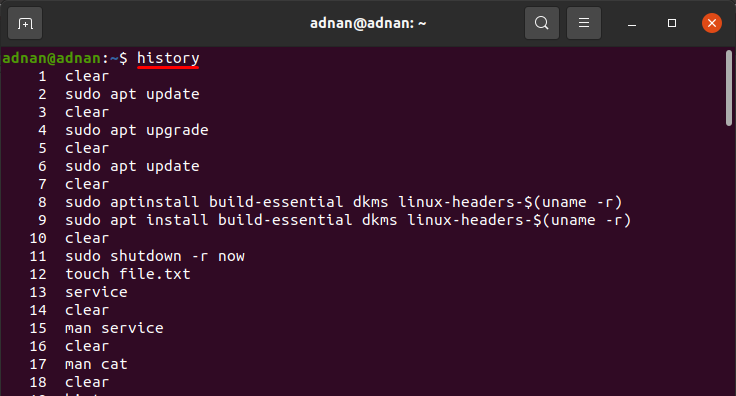
Ctrl + R :用于查找使用过的命令(history 命令用于列出之前使用过的所有命令,然后输入 ! 命令加上编号( !2 )就可以直接执行该历史命令);
Ctrl + L:清除屏幕并将当前行移到页面顶部;
Ctrl + C:中止当前正在执行的命令;
Ctrl + U:从光标位置剪切到行首;
Ctrl + K:从光标位置剪切到行尾;
Ctrl + W:剪切光标左侧的一个单词;
Ctrl + Y:粘贴 Ctrl + U | K | Y 剪切的命令;
Ctrl + A:光标跳到命令行的开头;
Ctrl + E:光标跳到命令行的结尾;
Ctrl + D:关闭 Shell 会话;
文件和目录
文件的组织
查看路径
pwd
显示当前目录的路径which
查看命令的可执行文件所在路径,Linux 下,每一条命令其实都对应一个可执行程序,在终端中输入命令,按回车的时候,就是执行了对应的那个程序, which 命令本身对应的程序也存在于 Linux 中。
总的来说一个命令就是一个可执行程序。
浏览和切换目录
ls
列出文件和目录,它是Linux 最常用的命令之一。
【常用参数】
-a 显示所有文件和目录包括隐藏的
-l 显示详细列表
-h 适合人类阅读的
-t 按文件最近一次修改时间排序
-i 显示文件的 inode ( inode 是文件内容的标识)
cd
cd 是英语 change directory 的缩写,表示切换目录。
cd /	--> 跳转到根目录
cd ~	--> 跳转到家目录
cd ..	--> 跳转到上级目录
cd ./home	--> 跳转到当前目录的home目录下
cd /home/lion	--> 跳转到根目录下的home目录下的lion目录
cd	--> 不添加任何参数,也是回到家目录
[注意] 输入cd /ho + 单次 tab 键会自动补全路径 + 两次 tab 键会列出所有可能的目录列表。
du
列举目录大小信息。 【常用参数】-h 适合人类阅读的;
-a 同时列举出目录下文件的大小信息;
-s 只显示总计大小,不显示具体信息。
浏览和创建文件
cat
一次性显示文件所有内容,更适合查看小的文件。cat cloud-init.log
【常用参数】
-n 显示行号。
less
分页显示文件内容,更适合查看大的文件。less cloud-init.log
【快捷操作】
空格键:前进一页(一个屏幕);
b 键:后退一页;
回车键:前进一行;
y 键:后退一行;
上下键:回退或前进一行;
d 键:前进半页;
u 键:后退半页;
q 键:停止读取文件,中止 less 命令;
= 键:显示当前页面的内容是文件中的第几行到第几行以及一些其它关于本页内容的详细信息;
h 键:显示帮助文档;
/ 键:进入搜索模式后,按 n 键跳到一个符合项目,按 N 键跳到上一个符合项目,同时也可以输入正则表达式匹配。
head
显示文件的开头几行(默认是10行)head cloud-init.log
【参数】
-n 指定行数 head cloud-init.log -n 2
tail
显示文件的结尾几行(默认是10行)tail cloud-init.log
【参数】
-n 指定行数 tail cloud-init.log -n 2
-f 会每过1秒检查下文件是否有更新内容,也可以用 -s 参数指定间隔时间 tail -f -s 4 xxx.log
touch
创建一个文件touch new_file
mkdir
创建一个目录mkdir new_folder
【常用参数】
-p 递归的创建目录结构 mkdir -p one/two/three
文件的复制和移动
cp
拷贝文件和目录cp file file_copy --> file 是目标文件,file_copy 是拷贝出来的文件
cp file one --> 把 file 文件拷贝到 one 目录下,并且文件名依然为 file
cp file one/file_copy --> 把 file 文件拷贝到 one 目录下,文件名为file_copy
cp *.txt folder --> 把当前目录下所有 txt 文件拷贝到 folder 目录下
【常用参数】
-r 递归的拷贝,常用来拷贝一整个目录
mv
移动(重命名)文件或目录,与cp命令用法相似。mv file one --> 将 file 文件移动到 one 目录下
mv new_folder one --> 将 new_folder 文件夹移动到one目录下
mv *.txt folder --> 把当前目录下所有 txt 文件移动到 folder 目录下
mv file new_file --> file 文件重命名为 new_file
文件的删除和链接
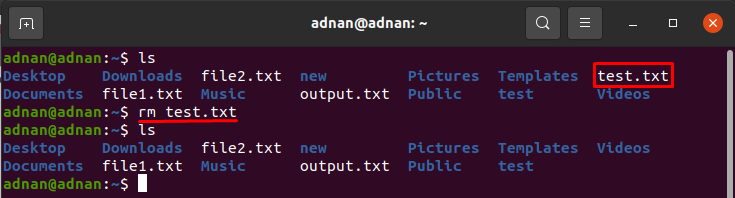
rm
删除文件和目录,由于Linux 下没有回收站,一旦删除非常难恢复,因此需要谨慎操作
rm new_file --> 删除 new_file 文件
rm f1 f2 f3 --> 同时删除 f1 f2 f3 3个文件
【常用参数】
-i 向用户确认是否删除;
-f 文件强制删除;
-r 递归删除文件夹,著名的删除操作 rm -rf 。
ln
英文Link 的缩写,表示创建链接。
学习创建链接之前,首先要理解链接是什么,我们先来看看 Linux 的文件是如何存储的:
Linux 文件的存储方式分为3个部分,文件名、文件内容以及权限,其中文件名的列表是存储在硬盘的其它地方和文件内容是分开存放的,每个文件名通过 inode 标识绑定到文件内容。
Linux 下有两种链接类型:硬链接和软链接。
硬链接
使链接的两个文件共享同样文件内容,就是同样的inode ,一旦文件1和文件2之间有了硬链接,那么修改任何一个文件,修改的都是同一块内容,它的缺点是,只能创建指向文件的硬链接,不能创建指向目录的(其实也可以,但比较复杂)而软链接都可以,因此软链接使用更加广泛。
ln file1 file2 --> 创建 file2 为 file1 的硬链接
rm file1 来删除 file1 ,对 file2 没有什么影响,对于硬链接来说,删除任意一方的文件,共同指向的文件内容并不会从硬盘上删除。只有同时删除了 file1 与 file2 后,它们共同指向的文件内容才会消失。
软链接
软链接就类似windows 下快捷方式。
ln -s file1 file2
ls -l 命名查看当前目录下文件的具体信息
total 0
-rw-r--r-- 1 root root 0 Jan 14 06:29 file1
lrwxrwxrwx 1 root root 5 Jan 14 06:42 file2 -> file1 # 表示file2 指向 file1
其实 file2 只是 file1 的一个快捷方式,它指向的是 file1 ,所以显示的是 file1 的内容,但其实 file2 的 inode 与 file1 并不相同。如果我们删除了 file2 的话, file1 是不会受影响的,但如果删除 file1 的话, file2 就会变成死链接,因为指向的文件不见了。
用户与权限
用户
Linux 是一个多用户的操作系统。在 Linux 中,理论上来说,我们可以创建无数个用户,但是这些用户是被划分到不同的群组里面的,有一个用户,名叫 root ,是一个很特殊的用户,它是超级用户,拥有最高权限。
Linux 系统的安全性,有效防止误操作或是病毒攻击,但是我们执行的某些命令需要更高权限时可以使用 sudo 命令。
sudo
以root 身份运行命令
sudo date --> 当然查看日期是不需要sudo的这里只是演示,sudo 完之后一般还需要输入用户密码的
useradd + passwd
useradd 添加新用户
passwd 修改用户密码
这两个命令需要 root 用户权限
useradd lion --> 添加一个lion用户,添加完之后在 /home 路径下可以查看
passwd lion --> 修改lion用户的密码
userdel
删除用户,需要root 用户权限
userdel lion --> 只会删除用户名,不会从/home中删除对应文件夹
userdel lion -r --> 会同时删除/home下的对应文件夹
su
切换用户,需要root 用户权限
sudo su --> 切换为root用户(exit 命令或 CTRL + D 快捷键都可以使普通用户切换为 root 用户)
su lion --> 切换为普通用户
su - --> 切换为root用户
群组的管理
Linux 中每个用户都属于一个特定的群组,如果你不设置用户的群组,默认会创建一个和它的用户名一样的群组,并且把用户划归到这个群组。
groupadd
创建群组,用法和useradd 类似。
groupadd friends
groupdel
删除一个已存在的群组groupdel foo --> 删除foo群组
groups
查看用户所在群组groups lion --> 查看 lion 用户所在的群组
usermod
用于修改用户的账户。 【常用参数】-l 对用户重命名。需要注意的是 /home 中的用户家目录的名字不会改变,需要手动修改。
-g 修改用户所在的群组,例如 usermod -g friends lion 修改 lion 用户的群组为 friends 。
-G 一次性让用户添加多个群组,例如 usermod -G friends,foo,bar lion 。
-a -G 会让你离开原先的群组,如果你不想这样做的话,就得再添加 -a 参数,意味着 append 追加的意思。
chgrp
用于修改文件的群组。chgrp bar file.txt --> file.txt文件的群组修改为bar
chown
改变文件的所有者,需要root 身份才能运行。
chown lion file.txt --> 把其它用户创建的file.txt转让给lion用户
chown lion:bar file.txt --> 把file.txt的用户改为lion,群组改为bar
【常用参数】
-R 递归设置子目录和子文件, chown -R lion:lion /home/frank 把 frank 文件夹的用户和群组都改为 lion 。
文件权限管理
chmod
修改访问权限。chmod 740 file.txt
【常用参数】
-R 可以递归地修改文件访问权限,例如 chmod -R 777 /home/lion
修改权限的确简单,但是理解其深层次的意义才是更加重要的。下面我们来系统的学习 Linux 的文件权限。
[root@lion ~]# ls -l
drwxr-xr-x 5 root root 4096 Apr 13 2020 climb
lrwxrwxrwx 1 root root 7 Jan 14 06:41 hello2.c -> hello.c
-rw-r--r-- 1 root root 149 Jan 13 06:14 hello.c
其中 drwxr-xr-x 表示文件或目录的权限。让我们一起来解读它具体代表什么?
d :表示目录,就是说这是一个目录,普通文件是 - ,链接是 l 。
r : read 表示文件可读。
w : write 表示文件可写,一般有写的权限,就有删除的权限。
x : execute 表示文件可执行。
- :表示没有相应权限。
权限的整体是按用户来划分的,如下图所示:
drwxr-xr-x 的意思:
它是一个文件夹;
它的所有者具有:读、写、执行权限;
它的群组用户具有:读、执行的权限,没有写的权限;
它的其它用户具有:读、执行的权限,没有写的权限。
现在理解了权限,我们使用 chmod 来尝试修改权限。 chmod 它不需要是 root 用户才能运行的,只要你是此文件所有者,就可以用 chmod 来修改文件的访问权限。
数字分配权限
| 权限 | 数字 |
|---|---|
| r | 4 |
| w | 2 |
| x | 1 |
chmod 640 hello.c
# 分析
6 = 4 + 2 + 0 表示所有者具有 rw 权限
4 = 4 + 0 + 0 表示群组用户具有 r 权限
0 = 0 + 0 + 0 表示其它用户没有权限
对应文字权限为:-rw-r-----
用字母来分配权限
u : user 的缩写,用户的意思,表示所有者。
g : group 的缩写,群组的意思,表示群组用户。
o : other 的缩写,其它的意思,表示其它用户。
a : all 的缩写,所有的意思,表示所有用户。
+ :加号,表示添加权限。
- :减号,表示去除权限。
= :等于号,表示分配权限。
chmod u+rx file --> 文件file的所有者增加读和运行的权限
chmod g+r file --> 文件file的群组用户增加读的权限
chmod o-r file --> 文件file的其它用户移除读的权限
chmod g+r o-r file --> 文件file的群组用户增加读的权限,其它用户移除读的权限
chmod go-r file --> 文件file的群组和其他用户移除读的权限
chmod +x file --> 文件file的所有用户增加运行的权限
chmod u=rwx,g=r,o=- file --> 文件file的所有者分配读写和执行的权限,群组其它用户分配读的权限,其他用户没有任何权限
查找文件
locate
搜索包含关键字的所有文件和目录。后接需要查找的文件名,也可以用正则表达式。
安装 locate
yum -y install mlocate --> 安装包
updatedb --> 更新数据库
locate file.txt
locate fil*.txt
[注意] locate 命令会去文件数据库中查找命令,而不是全磁盘查找,因此刚创建的文件并不会更新到数据库中,所以无法被查找到,可以执行 updatedb 命令去更新数据库。
find
用于查找文件,它会去遍历你的实际硬盘进行查找,而且它允许我们对每个找到的文件进行后续操作,功能非常强大。
find <何处> <何物> <做什么>
何处:指定在哪个目录查找,此目录的所有子目录也会被查找。
何物:查找什么,可以根据文件的名字来查找,也可以根据其大小来查找,还可以根据其最近访问时间来查找。
做什么:找到文件后,可以进行后续处理,如果不指定这个参数, find 命令只会显示找到的文件。
根据文件名查找
find -name "file.txt" --> 当前目录以及子目录下通过名称查找文件
find . -name "syslog" --> 当前目录以及子目录下通过名称查找文件
find / -name "syslog" --> 整个硬盘下查找syslog
find /var/log -name "syslog" --> 在指定的目录/var/log下查找syslog文件
find /var/log -name "syslog*" --> 查找syslog1、syslog2 ... 等文件,通配符表示所有
find /var/log -name "*syslog*" --> 查找包含syslog的文件
[注意] find 命令只会查找完全符合 “何物” 字符串的文件,而 locate 会查找所有包含关键字的文件。
根据文件大小查找
find /var -size +10M --> /var 目录下查找文件大小超过 10M 的文件
find /var -size -50k --> /var 目录下查找文件大小小于 50k 的文件
find /var -size +1G --> /var 目录下查找文件大小查过 1G 的文件
find /var -size 1M --> /var 目录下查找文件大小等于 1M 的文件
根据文件最近访问时间查找
find -name "*.txt" -atime -7 --> 近 7天内访问过的.txt结尾的文件
仅查找目录或文件
find . -name "file" -type f --> 只查找当前目录下的file文件
find . -name "file" -type d --> 只查找当前目录下的file目录
操作查找结果
find -name "*.txt" -printf "%p - %u\n" --> 找出所有后缀为txt的文件,并按照 %p - %u\n 格式打印,其中%p=文件名,%u=文件所有者
find -name "*.jpg" -delete --> 删除当前目录以及子目录下所有.jpg为后缀的文件,不会有删除提示,因此要慎用
find -name "*.c" -exec chmod 600 {} \; --> 对每个.c结尾的文件,都进行 -exec 参数指定的操作,{} 会被查找到的文件替代,\; 是必须的结尾
find -name "*.c" -ok chmod 600 {} \; --> 和上面的功能一直,会多一个确认提示
软件仓库
Linux 下软件是以包的形式存在,一个软件包其实就是软件的所有文件的压缩包,是二进制的形式,包含了安装软件的所有指令。 Red Hat 家族的软件包后缀名一般为 .rpm , Debian 家族的软件包后缀是 .deb 。
Linux 的包都存在一个仓库,叫做软件仓库,它可以使用 yum 来管理软件包, yum 是 CentOS 中默认的包管理工具,适用于 Red Hat 一族。可以理解成 Node.js 的 npm 。
yum 常用命令
yum update | yum upgrade 更新软件包
yum search xxx 搜索相应的软件包
yum install xxx 安装软件包
yum remove xxx 删除软件包
切换 CentOS 软件源
有时候 CentOS 默认的 yum 源不一定是国内镜像,导致 yum 在线安装及更新速度不是很理想。这时候需要将 yum 源设置为国内镜像站点。国内主要开源的镜像站点是网易和阿里云。
1、首先备份系统自带 yum 源配置文件 mv /etc/yum.repos.d/CentOS-Base.repo /etc/yum.repos.d/CentOS-Base.repo.backup
2、下载阿里云的 yum 源配置文件到 /etc/yum.repos.d/CentOS7
wget -O /etc/yum.repos.d/CentOS-Base.repo http://mirrors.aliyun.com/repo/Centos-7.repo
3、生成缓存
yum makecache
阅读手册
Linux 命令种类繁杂,我们凭借记忆不可能全部记住,因此学会查用手册是非常重要的。
man
安装更新 man
sudo yum install -y man-pages --> 安装
sudo mandb --> 更新
man 手册种类
可执行程序或Shell 命令;
系统调用( Linux 内核提供的函数);
库调用(程序库中的函数);
文件(例如 /etc/passwd );
特殊文件(通常在 /dev 下);
游戏;
杂项( man(7) ,groff(7) );
系统管理命令(通常只能被 root 用户使用);
内核子程序。
man + 数字 + 命令
输入 man + 数字 + 命令/函数,可以查到相关的命令和函数,若不加数字,man 默认从数字较小的手册中寻找相关命令和函数
man 3 rand --> 表示在手册的第三部分查找 rand 函数
man ls --> 查找 ls 用法手册
man 手册核心区域解析:(以 man pwd 为例)
NAME # 命令名称和简单描述
pwd -- return working directory name
SYNOPSIS # 使用此命令的所有方法
pwd [-L | -P]
DESCRIPTION # 包括所有参数以及用法
The pwd utility writes the absolute pathname of the current working directory to the standard output.
Some shells may provide a builtin pwd command which is similar or identical to this utility. Consult the builtin(1) manual page.
The options are as follows:
-L Display the logical current working directory.
-P Display the physical current working directory (all symbolic links resolved).
If no options are specified, the -L option is assumed.
SEE ALSO # 扩展阅读相关命令
builtin(1), cd(1), csh(1), sh(1), getcwd(3)
help
man 命令像新华词典一样可以查询到命令或函数的详细信息,但其实我们还有更加快捷的方式去查询, command --help 或 command -h ,它没有 man 命令显示的那么详细,但是它更加易于阅读。
Linux 进阶
文本操作
grep
全局搜索一个正则表达式,并且打印到屏幕。简单来说就是,在文件中查找关键字,并显示关键字所在行。基础语法
grep text file # text代表要搜索的文本,file代表供搜索的文件
# 实例
[root@lion ~]# grep path /etc/profile
pathmunge () {
pathmunge /usr/sbin
pathmunge /usr/local/sbin
pathmunge /usr/local/sbin after
pathmunge /usr/sbin after
unset -f pathmunge
常用参数
-i 忽略大小写, grep -i path /etc/profile
-n 显示行号,grep -n path /etc/profile
-v 只显示搜索文本不在的那些行,grep -v path /etc/profile
-r 递归查找, grep -r hello /etc ,Linux 中还有一个 rgrep 命令,作用相当于 grep -r
高级用法
grep 可以配合正则表达式使用。grep -E path /etc/profile --> 完全匹配path
grep -E ^path /etc/profile --> 匹配path开头的字符串
grep -E [Pp]ath /etc/profile --> 匹配path或Path
sort
对文件的行进行排序。
基础语法
sort name.txt # 对name.txt文件进行排序
实例用法
为了演示方便,我们首先创建一个文件name.txt ,放入以下内容:
Christopher
Shawn
Ted
Rock
Noah
Zachary
Bella
执行 sort name.txt 命令,会对文本内容进行排序。常用参数
-o 将排序后的文件写入新文件, sort -o name_sorted.txt name.txt ;
-r 倒序排序, sort -r name.txt ;
-R 随机排序, sort -R name.txt ;
-n 对数字进行排序,默认是把数字识别成字符串的,因此 138 会排在 25 前面,如果添加了 -n 数字排序的话,则 25 会在 138 前面。
wc
word count 的缩写,用于文件的统计。它可以统计单词数目、行数、字符数,字节数等。
基础语法
wc name.txt # 统计name.txt
实例用法
[root@lion ~]# wc name.txt
13 13 91 name.txt
第一个13,表示行数;
第二个13,表示单词数;
第三个91,表示字节数。
常用参数
-l 只统计行数, wc -l name.txt ;
-w 只统计单词数, wc -w name.txt ;
-c 只统计字节数, wc -c name.txt ;
-m 只统计字符数, wc -m name.txt 。
uniq
删除文件中的重复内容。基础语法
uniq name.txt # 去除name.txt重复的行数,并打印到屏幕上
uniq name.txt uniq_name.txt # 把去除重复后的文件保存为 uniq_name.txt
【注意】它只能去除连续重复的行数。常用参数
-c 统计重复行数, uniq -c name.txt ;
-d 只显示重复的行数, uniq -d name.txt 。
cut
剪切文件的一部分内容。基础语法
cut -c 2-4 name.txt # 剪切每一行第二到第四个字符
常用参数
-d 用于指定用什么分隔符(比如逗号、分号、双引号等等) cut -d , name.txt ;
-f 表示剪切下用分隔符分割的哪一块或哪几块区域, cut -d , -f 1 name.txt 。
重定向 管道 流
在 Linux 中一个命令的去向可以有3个地方:终端、文件、作为另外一个命令的入参。命令一般都是通过键盘输入,然后输出到终端、文件等地方,它的标准用语是
stdin 、 stdout 以及 stderr 。标准输入
stdin ,终端接收键盘输入的命令,会产生两种输出;
标准输出 stdout ,终端输出的信息(不包含错误信息);
标准错误输出 stderr ,终端输出的错误信息。
重定向
把本来要显示在终端的命令结果,输送到别的地方(到文件中或者作为其他命令的输入)。 输出重定向 >
> 表示重定向到新的文件, cut -d , -f 1 notes.csv > name.csv ,它表示通过逗号剪切 notes.csv 文件(剪切完有3个部分)获取第一个部分,重定向到 name.csv 文件。我们来看一个具体示例,学习它的使用,假设我们有一个文件
notes.csv ,文件内容如下:
Mark1,951/100,很不错1
Mark2,952/100,很不错2
Mark3,953/100,很不错3
Mark4,954/100,很不错4
Mark5,955/100,很不错5
Mark6,956/100,很不错6
执行命令: cut -d , -f 1 notes.csv > name.csv 最后输出如下内容:
Mark1
...
Mark6
【注意】使用 > 要注意,如果输出的文件不存在它会新建一个,如果输出的文件已经存在,则会覆盖。因此执行这个操作要非常小心,以免覆盖其它重要文件。 输出重定向 >>
表示重定向到文件末尾,因此它不会像 > 命令这么危险,它是追加到文件的末尾(当然如果文件不存在,也会被创建)。 再次执行
cut -d , -f 1 notes.csv >> name.csv ,则会把名字追加到 name.csv 里面。
Mark1
...
Mark6
我们平时读的 log 日志文件其实都是用这个命令输出的。 输出重定向 2>
标准错误输出
cat not_exist_file.csv > res.txt 2> errors.log
当我们 cat 一个文件时,会把文件内容打印到屏幕上,这个是标准输出;
当使用了 > res.txt 时,则不会打印到屏幕,会把标准输出写入文件 res.txt 文件中;
2> errors.log 当发生错误时会写入 errors.log 文件中。
输出重定向 2>>
标准错误输出(追加到文件末尾)同 >> 相似。 输出重定向 2>&1
标准输出和标准错误输出都重定向都一个地方
cat not_exist_file.csv > res.txt 2>&1 # 覆盖输出
cat not_exist_file.csv >> res.txt 2>&1 # 追加输出
目前为止,我们接触的命令的输入都来自命令的参数,其实命令的输入还可以来自文件或者键盘的输入。
输入重定向 <
< 符号用于指定命令的输入。
cat < name.csv # 指定命令的输入为 name.csv
虽然它的运行结果与 cat name.csv 一样,但是它们的原理却完全不同。cat name.csv 表示 cat 命令接收的输入是 notes.csv 文件名,那么要先打开这个文件,然后打印出文件内容。
cat < name.csv 表示 cat 命令接收的输入直接是 notes.csv 这个文件的内容, cat 命令只负责将其内容打印,打开文件并将文件内容传递给 cat 命令的工作则交给终端完成。
输入重定向 <<
将键盘的输入重定向为某个命令的输入。
sort -n << END # 输入这个命令之后,按下回车,终端就进入键盘输入模式,其中END为结束命令(这个可以自定义)
wc -m << END # 统计输入的单词
管道 |
把两个命令连起来使用,一个命令的输出作为另外一个命令的输入,英文是 | pipeline ,可以想象一个个水管连接起来,管道算是重定向流的一种。举几个实际用法案例:
cut -d , -f 1 name.csv | sort > sorted_name.txt
# 第一步获取到的 name 列表,通过管道符再进行排序,最后输出到sorted_name.txt
du | sort -nr | head
# du 表示列举目录大小信息
# sort 进行排序,-n 表示按数字排序,-r 表示倒序
# head 前10行文件
grep log -Ir /var/log | cut -d : -f 1 | sort | uniq
# grep log -Ir /var/log 表示在log文件夹下搜索 /var/log 文本,-r 表示递归,-I 用于排除二进制文件
# cut -d : -f 1 表示通过冒号进行剪切,获取剪切的第一部分
# sort 进行排序
# uniq 进行去重
流
流并非一个命令,在计算机科学中,流 stream 的含义是比较难理解的,记住一点即可:到此我们就接触了,流、重定向、管道等
Linux 高级概念及指令。其实你会发现关于流和管道在其它语言中也有广泛的应用。 Angular 中的模板语法中可以使用管道。 Node.js 中也有 stream 流的概念。 查看进程
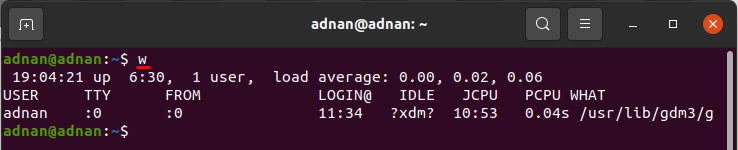
在 Windows 中通过 Ctrl + Alt + Delete 快捷键查看软件进程。 w
帮助我们快速了解系统中目前有哪些用户登录着,以及他们在干什么。
[root@lion ~]# w
06:31:53 up 25 days, 9:53, 1 user, load average: 0.00, 0.01, 0.05
USER TTY FROM LOGIN@ IDLE JCPU PCPU WHAT
root pts/0 118.31.243.53 05:56 1.00s 0.02s 0.00s w
06:31:53:表示当前时间
up 25 days, 9:53:表示系统已经正常运行了“25天9小时53分钟”
1 user:表示一个用户
load average: 0.00, 0.01, 0.05:表示系统的负载,3个值分别表示“1分钟的平均负载”,“5分钟的平均负载”,“15分钟的平均负载”
USER:表示登录的用于
TTY:登录的终端名称为pts/0
FROM:连接到服务器的ip地址
LOGIN@:登录时间
IDLE:用户有多久没有活跃了
JCPU:该终端所有相关的进程使用的 CPU 时间,每当进程结束就停止计时,开始新的进程则会重新计时
PCPU:表示 CPU 执行当前程序所消耗的时间,当前进程就是在 WHAT 列里显示的程序
WHAT:表示当下用户正运行的程序是什么,这里我运行的是 w
ps
用于显示当前系统中的进程, ps 命令显示的进程列表不会随时间而更新,是静态的,是运行 ps 命令那个时刻的状态或者说是一个进程快照。基础语法
[root@lion ~]# ps
PID TTY TIME CMD
1793 pts/0 00:00:00 bash
4756 pts/0 00:00:00 ps
PID:进程号,每个进程都有唯一的进程号
TTY:进程运行所在的终端
TIME:进程运行时间
CMD:产生这个进程的程序名,如果在进程列表中看到有好几行都是同样的程序名,那么就是同样的程序产生了不止一个进程
常用参数
-ef 列出所有进程;
-efH 以乔木状列举出所有进程;
-u 列出此用户运行的进程;
-aux 通过 CPU 和内存使用来过滤进程 ps -aux | less ;
-aux --sort -pcpu 按 CPU 使用降序排列, -aux --sort -pmem 表示按内存使用降序排列;
-axjf 以树形结构显示进程, ps -axjf 它和 pstree 效果类似。
top
获取进程的动态列表。top - 07:20:07 up 25 days, 10:41, 1 user, load average: 0.30, 0.10, 0.07
Tasks: 67 total, 1 running, 66 sleeping, 0 stopped, 0 zombie
%Cpu(s): 0.7 us, 0.3 sy, 0.0 ni, 99.0 id, 0.0 wa, 0.0 hi, 0.0 si, 0.0 st
KiB Mem : 1882072 total, 552148 free, 101048 used, 1228876 buff/cache
KiB Swap: 0 total, 0 free, 0 used. 1594080 avail Mem
PID USER PR NI VIRT RES SHR S %CPU %MEM TIME+ COMMAND
956 root 10 -10 133964 15848 10240 S 0.7 0.8 263:13.01 AliYunDun
1 root 20 0 51644 3664 2400 S 0.0 0.2 3:23.63 systemd
2 root 20 0 0 0 0 S 0.0 0.0 0:00.05 kthreadd
4 root 0 -20 0 0 0 S 0.0 0.0 0:00.00 kworker/0:0H
top - 07:20:07 up 25 days, 10:41, 1 user, load average: 0.30, 0.10, 0.07 相当 w 命令的第一行的信息。
展示的这些进程是按照使用处理器 %CPU 的使用率来排序的。
kill
结束一个进程, kill + PID 。
kill 956 # 结束进程号为956的进程
kill 956 957 # 结束多个进程
kill -9 7291 # 强制结束进程
管理进程
进程状态
主要是切换进程的状态。我们先了解下 Linux 下进程的五种状态:
状态码 R :表示正在运行的状态;
状态码 S :表示中断(休眠中,受阻,当某个条件形成后或接受到信号时,则脱离该状态);
状态码 D :表示不可中断(进程不响应系统异步信号,即使用kill命令也不能使其中断);
状态码 Z :表示僵死(进程已终止,但进程描述符依然存在,直到父进程调用 wait4() 系统函数后将进程释放);
状态码 T :表示停止(进程收到 SIGSTOP 、 SIGSTP 、 SIGTIN 、 SIGTOU 等停止信号后停止运行)。
前台进程 & 后台进程
默认情况下,用户创建的进程都是前台进程,前台进程从键盘读取数据,并把处理结果输出到显示器。例如运行 top 命令,这就是一个一直运行的前台进程。
后台进程的优点是不必等待程序运行结束,就可以输入其它命令。在需要执行的命令后面添加 & 符号,就表示启动一个后台进程。
&
启动后台进程,它的缺点是后台进程与终端相关联,一旦关闭终端,进程就自动结束了。
cp name.csv name-copy.csv &
nohup
使进程不受挂断(关闭终端等动作)的影响。
nohup cp name.csv name-copy.csv
nohup 命令也可以和 & 结合使用。
nohup cp name.csv name-copy.csv &
bg
使一个“后台暂停运行”的进程,状态改为“后台运行”。
bg %1 # 不加任何参数的情况下,bg命令会默认作用于最近的一个后台进程,如果添加参数则会作用于指定标号的进程
实际案例1:
1. 执行 grep -r "log" / > grep_log 2>&1 命令启动一个前台进程,并且忘记添加 & 符号
2. ctrl + z 使进程状态转为后台暂停
3. 执行 bg 将命令转为后台运行
实际案例2:
前端开发时我们经常会执行 yarn start 启动项目
此时我们执行 ctrl + z 先使其暂停
然后执行 bg 使其转为后台运行
这样当前终端就空闲出来可以干其它事情了,如果想要唤醒它就使用 fg 命令即可(后面会讲)
jobs
显示当前终端后台进程状态。
[root@lion ~]# jobs
[1]+ Stopped top
[2]- Running grep --color=auto -r "log" / > grep_log 2>&1 &
fg
fg 使进程转为前台运行,用法和 bg 命令类似。我们用一张图来表示前后台进程切换:
我们可以使程序在后台运行,成为后台进程,这样在当前终端中我们就可以做其他事情了,而不必等待此进程运行结束。
守护进程
一个运行起来的程序被称为进程。在 Linux 中有些进程是特殊的,它不与任何进程关联,不论用户的身份如何,都在后台运行,这些进程的父进程是 PID 为1的进程, PID 为1的进程只在系统关闭时才会被销毁。它们会在后台一直运行等待分配工作。我们将这类进程称之为守护进程 daemon 。
守护进程的名字通常会在最后有一个 d ,表示 daemon 守护的意思,例如 systemd 、httpd 。 systemd
systemd 是一个 Linux 系统基础组件的集合,提供了一个系统和服务管理器,运行为 PID 1 并负责启动其它程序。
[root@lion ~]# ps -aux
USER PID %CPU %MEM VSZ RSS TTY STAT START TIME COMMAND
root 1 0.0 0.2 51648 3852 ? Ss Feb01 1:50 /usr/lib/systemd/systemd --switched-root --system --deserialize 22
通过命令也可以看到 PID 为1的进程就是 systemd 的系统进程。systemd 常用命令(它是一组命令的集合):
systemctl start nginx # 启动服务
systemctl stop nginx # 停止服务
systemctl restart nginx # 重启服务
systemctl status nginx # 查看服务状态
systemctl reload nginx # 重载配置文件(不停止服务的情况)
systemctl enable nginx # 开机自动启动服务
systemctl disable nginx # 开机不自动启动服务
systemctl is-enabled nginx # 查看服务是否开机自动启动
systemctl list-unit-files --type=service # 查看各个级别下服务的启动和禁用情况
文件压缩解压
打包:是将多个文件变成一个总的文件,它的学名叫存档、归档。
压缩:是将一个大文件(通常指归档)压缩变成一个小文件。
我们常常使用
tar 将多个文件归档为一个总的文件,称为 archive 。 然后用 gzip 或 bzip2 命令将 archive 压缩为更小的文件。 tar
创建一个 tar 归档。基础用法
tar -cvf sort.tar sort/ # 将sort文件夹归档为sort.tar
tar -cvf archive.tar file1 file2 file3 # 将 file1 file2 file3 归档为archive.tar
常用参数
-cvf 表示 create(创建)+ verbose(细节)+ file(文件),创建归档文件并显示操作细节;
-tf 显示归档里的内容,并不解开归档;
-rvf 追加文件到归档, tar -rvf archive.tar file.txt ;
-xvf 解开归档, tar -xvf archive.tar 。
gzip / gunzip
“压缩/解压”归档,默认用 gzip 命令,压缩后的文件后缀名为 .tar.gz 。
gzip archive.tar # 压缩
gunzip archive.tar.gz # 解压
tar 归档+压缩
可以用 tar 命令同时完成归档和压缩的操作,就是给 tar 命令多加一个选项参数,使之完成归档操作后,还是调用 gzip 或 bzip2 命令来完成压缩操作。
tar -zcvf archive.tar.gz archive/ # 将archive文件夹归档并压缩
tar -zxvf archive.tar.gz # 将archive.tar.gz归档压缩文件解压
zcat、zless、zmore
之前讲过使用 cat less more 可以查看文件内容,但是压缩文件的内容是不能使用这些命令进行查看的,而要使用 zcat、zless、zmore 进行查看。
zcat archive.tar.gz
zip/unzip
“压缩/解压” zip 文件( zip 压缩文件一般来自 windows 操作系统)。命令安装
# Red Hat 一族中的安装方式
yum install zip
yum install unzip
基础用法
unzip archive.zip # 解压 .zip 文件
unzip -l archive.zip # 不解开 .zip 文件,只看其中内容
zip -r sort.zip sort/ # 将sort文件夹压缩为 sort.zip,其中-r表示递归
编译安装软件
之前我们学会了使用 yum 命令进行软件安装,如果碰到 yum 仓库中没有的软件,我们就需要会更高级的软件安装“源码编译安装”。
编译安装
简单来说,编译就是将程序的源代码转换成可执行文件的过程。大多数 Linux 的程序都是开放源码的,可以编译成适合我们的电脑和操纵系统属性的可执行文件。基本步骤如下: 下载源代码 解压压缩包 配置 编译 安装
实际案例
1、下载
我们来编译安装htop 软件,首先在它的官网下载源码:bintray.com/htop/source…下载好的源码在本机电脑上使用如下命令同步到服务器上:
scp 文件名 用户名@服务器ip:目标路径
scp ~/Desktop/htop-3.0.0.tar.gz root@121.42.11.34:.
也可以使用 wegt 进行下载:
wegt+下载地址
wegt https://bintray.com/htop/source/download_file?file_path=htop-3.0.0.tar.gz
2、解压文件
tar -zxvf htop-3.0.0.tar.gz # 解压
cd htop-3.0.0 # 进入目录
3、配置
执行./configure ,它会分析你的电脑去确认编译所需的工具是否都已经安装了。4、编译
执行make 命令5、安装
执行make install 命令,安装完成后执行 ls /usr/local/bin/ 查看是否有 htop 命令。如果有就可以执行 htop 命令查看系统进程了。 网络
ifconfig
查看 ip 网络相关信息,如果命令不存在的话, 执行命令 yum install net-tools 安装。
[root@lion ~]# ifconfig
eth0: flags=4163<UP,BROADCAST,RUNNING,MULTICAST> mtu 1500
inet 172.31.24.78 netmask 255.255.240.0 broadcast 172.31.31.255
ether 00:16:3e:04:9c:cd txqueuelen 1000 (Ethernet)
RX packets 1592318 bytes 183722250 (175.2 MiB)
RX errors 0 dropped 0 overruns 0 frame 0
TX packets 1539361 bytes 154044090 (146.9 MiB)
TX errors 0 dropped 0 overruns 0 carrier 0 collisions 0
lo: flags=73<UP,LOOPBACK,RUNNING> mtu 65536
inet 127.0.0.1 netmask 255.0.0.0
loop txqueuelen 1000 (Local Loopback)
RX packets 0 bytes 0 (0.0 B)
RX errors 0 dropped 0 overruns 0 frame 0
TX packets 0 bytes 0 (0.0 B)
TX errors 0 dropped 0 overruns 0 carrier 0 collisions 0
参数解析:
eth0 对应有线连接(对应你的有线网卡),就是用网线来连接的上网。 eth 是 Ethernet 的缩写,表示“以太网”。有些电脑可能同时有好几条网线连着,例如服务器,那么除了 eht0 ,你还会看到 eth1 、 eth2 等。
lo 表示本地回环( Local Loopback 的缩写,对应一个虚拟网卡)可以看到它的 ip 地址是 127.0.0.1 。每台电脑都应该有这个接口,因为它对应着“连向自己的链接”。这也是被称之为“本地回环”的原因。所有经由这个接口发送的东西都会回到你自己的电脑。看起来好像并没有什么用,但有时为了某些缘故,我们需要连接自己。例如用来测试一个网络程序,但又不想让局域网或外网的用户查看,只能在此台主机上运行和查看所有的网络接口。例如在我们启动一个前端工程时,在浏览器输入 127.0.0.1:3000 启动项目就能查看到自己的 web 网站,并且它只有你能看到。
wlan0 表示无线局域网(上面案例并未展示)。
host
ip 地址和主机名的互相转换。
软件安装
yum install bind-utils
基础用法
[root@lion ~]# host github.com
baidu.com has address 13.229.188.59
[root@lion ~]# host 13.229.188.59
59.188.229.13.in-addr.arpa domain name pointer ec2-13-229-188-59.ap-southeast-1.compute.amazonaws.com.
ssh 连接远程服务器
通过非对称加密以及对称加密的方式(同 HTTPS 安全连接原理相似)连接到远端服务器。
ssh 用户@ip:port
1、ssh root@172.20.10.1:22 # 端口号可以省略不写,默认是22端口
2、输入连接密码后就可以操作远端服务器了
配置 ssh
config 文件可以配置 ssh ,方便批量管理多个 ssh 连接。配置文件分为以下几种: 全局
ssh 服务端的配置: /etc/ssh/sshd_config ;
全局 ssh 客户端的配置: /etc/ssh/ssh_config(很少修改);
当前用户 ssh 客户端的配置: ~/.ssh/config 。
【服务端
config 文件的常用配置参数】
| 服务端 config 参数 | 作用 |
|---|---|
| Port | sshd 服务端口号(默认是22) |
| PermitRootLogin | 是否允许以 root 用户身份登录(默认是可以) |
| PasswordAuthentication | 是否允许密码验证登录(默认是可以) |
| PubkeyAuthentication | 是否允许公钥验证登录(默认是可以) |
| PermitEmptyPasswords | 是否允许空密码登录(不安全,默认不可以) |
systemctl restart sshd 【客户端
config 文件的常用配置参数】
| 客户端 config 参数 | 作用 |
|---|---|
| Host | 别名 |
| HostName | 远程主机名(或 IP 地址) |
| Port | 连接到远程主机的端口 |
| User | 用户名 |
配置当前用户的
config :
# 创建config
vim ~/.ssh/config
# 填写一下内容
Host lion # 别名
HostName 172.x.x.x # ip 地址
Port 22 # 端口
User root # 用户
这样配置完成后,下次登录时,可以这样登录 ssh lion 会自动识别为 root 用户。[注意] 这段配置不是在服务器上,而是你自己的机器上,它仅仅是设置了一个别名。
免密登录
ssh 登录分两种,一种是基于口令(账号密码),另外一种是基于密钥的方式。基于口令,就是每次登录输入账号和密码,显然这样做是比较麻烦的,今天主要学习如何基于密钥实现免密登录。
基于密钥验证原理
客户机生成密钥对(公钥和私钥),把公钥上传到服务器,每次登录会与服务器的公钥进行比较,这种验证登录的方法更加安全,也被称为“公钥验证登录”。具体实现步骤
1、在客户机中生成密钥对(公钥和私钥)ssh-keygen(默认使用 RSA 非对称加密算法)运行完
ssh-keygen 会在 ~/.ssh/ 目录下,生成两个文件:
id_rsa.pub :公钥
id_rsa :私钥
2、把客户机的公钥传送到服务
执行
ssh-copy-id root@172.x.x.x(ssh-copy-id 它会把客户机的公钥追加到服务器 ~/.ssh/authorized_keys 的文件中)。执行完成后,运行
ssh root@172.x.x.x 就可以实现免密登录服务器了。
配合上面设置好的别名,直接执行 ssh lion 就可以登录,是不是非常方便。
wget
可以使我们直接从终端控制台下载文件,只需要给出文件的HTTP或FTP地址。
wget [参数][URL地址]
wget http://www.minjieren.com/wordpress-3.1-zh_CN.zip
wget 非常稳定,如果是由于网络原因下载失败, wget 会不断尝试,直到整个文件下载完毕。常用参数
-c 继续中断的下载。
备份
scp
它是 Secure Copy 的缩写,表示安全拷贝。 scp 可以使我们通过网络,把文件从一台电脑拷贝到另一台电脑。scp 是基于 ssh 的原理来运作的, ssh 会在两台通过网络连接的电脑之间创建一条安全通信的管道, scp 就利用这条管道安全地拷贝文件。
scp source_file destination_file # source_file 表示源文件,destination_file 表示目标文件
其中 source_file 和 destination_file 都可以这样表示: user@ip:file_name , user 是登录名, ip 是域名或 ip 地址。 file_name 是文件路径。
scp file.txt root@192.168.1.5:/root # 表示把我的电脑中当前文件夹下的 file.txt 文件拷贝到远程电脑
scp root@192.168.1.5:/root/file.txt file.txt # 表示把远程电脑上的 file.txt 文件拷贝到本机
rsync
rsync 命令主要用于远程同步文件。它可以同步两个目录,不管它们是否处于同一台电脑。它应该是最常用于“增量备份”的命令了。它就是智能版的 scp 命令。软件安装
yum install rsync
基础用法
rsync -arv Images/ backups/ # 将Images 目录下的所有文件备份到 backups 目录下
rsync -arv Images/ root@192.x.x.x:backups/ # 同步到服务器的backups目录下
常用参数
-a 保留文件的所有信息,包括权限,修改日期等;
-r 递归调用,表示子目录的所有文件也都包括;
-v 冗余模式,输出详细操作信息。
默认地,
rsync 在同步时并不会删除目标目录的文件,例如你在源目录中删除一个文件,但是用 rsync 同步时,它并不会删除同步目录中的相同文件。如果向删除也可以这么做: rsync -arv --delete Images/ backups/ 。 系统
halt
关闭系统,需要 root 身份。
halt
reboot
重启系统,需要 root 身份。
reboot
poweroff
直接运行即可关机,不需要 root 身份。
Vim 编辑器
Vim 是什么?
Vim 是从 vi 发展出来的一个文本编辑器。其代码补完、编译及错误跳转等方便编程的功能特别丰富,在程序员中被广泛使用。和 Emacs 并列成为类 Unix 系统用户最喜欢的编辑器。 Vim 常用模式
交互模式
插入模式
命令模式
可视模式
交互模式
也成为正常模式,这是 Vim 的默认模式,每次运行 Vim 程序的时候,就会进入这个模式。例如执行
vim name.txt 则会进入交互模式。交互模式特征: 在这个模式下,你不能输入文本; 它可以让我们在文本间移动,删除一行文本,复制黏贴文本,跳转到指定行,撤销操作,等等。
插入模式
这个模式是我们熟悉的文本编辑器的模式,就是可以输入任何你想输入的内容。进入这个模式有几种方法,最常用的方法是按字母键 i ( i、I、a、A、o、O 都可以进入插入模式,只是所处的位置不同),退出这种模式,只需要按下 Esc 键。i, I 进入输入模式 Insert mode : i 为“从目前光标所在处输入”, I 为“在目前所在行的第一个非空格符处开始输入”;
a, A 进入输入模式 Insert mode : a 为“从目前光标所在的下一个字符处开始输入”, A 为“从光标所在行的最后一个字符处开始输入”;
o, O 进入输入模式 Insert mode : o 为“在目前光标所在的下一行处输入新的一行”; O 为在目前光标所在处的上一行输入新的一行。
命令模式
命令模式也称为底线命令模式,这个模式下可以运行一些命令例如“退出”,“保存”,等动作。也可以用这个模式来激活一些
Vim 配置,例如语法高亮,显示行号,等。甚至还可以发送一些命令给终端命令行,例如 ls、cp 。为了进入命令模式,首先要进入交互模式,再按下冒号键。
用一张图表示三种模式如何切换:
基本操作
打开 Vim
在终端命令行中输入 vim 回车后 Vim 就会被运行起来,也可以用 Vim 来打开一个文件,只需要在 vim 后面再加文件名。如 vim file.name ,如果文件不存在,那么会被创建。 插入
进入文件之后,此时处于交互模式,可以通过输入 i 进入插入模式。 移动
在 Vim 的交互模式下,我们可以在文本中移动光标。h 向左移动一个字符
j 向下移动一个字符
k 向上移动一个字符
i 向右移动一个字符
当然也可以使用四个方向键进行移动,效果是一样的。
跳至行首和行末
行首:在交互模式下,为了将光标定位到一行的开始位置,只需要按下数字键 0 即可,键盘上的 Home 键也有相同效果。
行末:在交互模式下,为了将光标定位到一行的末尾,只需要按下美元符号键 $ 即可,键盘上的 End 键也有相同效果。
按单词移动
在交互模式下,按字母键 w 可以一个单词一个单词的移动。 退出文件
在交互模式下,按下冒号键 : 进入命令模式,再按下 q 键,就可以退出了。如果在退出之前又修改了文件,就直接想用
:q 退出 Vim ,那么 Vim 会显示一个红字标明错误信息。此时我们有两个选择:
保存并退出 :wq 或 :x ;
不保存且退出 :q! 。
标准操作
删除字符
在交互模式下,将光标定位到一个你想要删除的字符上,按下字母键 x 你会发现这个字符被删除了。也可以一次性删除多个字符,只需要在按
x 键之前输入数字即可。 删除(剪切)单词,行
删除一行:连按两次 d 来删除光标所在的那一行。
删除多行:例如先输入数字 2 ,再按下 dd ,就会删除从光标所在行开始的两行。
删除一个单词:将光标置于一个单词的首字母处,然后按下 dw 。
删除多个单词:例如先按数字键 2 再按 dw 就可以删除两个单词了。
从光标所在位置删除至行首: d0 。
从光标所在位置删除至行末: d$ 。
复制单词,行
复制行:按两次 y 会把光标所在行复制到内存中,和 dd 类似, dd 用于“剪切”光标所在行。
复制单词: yw 会复制一个单词。
复制到行末: y$ 是复制从光标所在处到行末的所有字符。
复制到行首: y0 是复制光标所在处到行首的所有字符。
粘贴
如果之前用 dd 或者 yy 剪切复制过来的,可以使用 p 来粘贴。同样也可以使用 数字+p 来表示复制多次。 替换一个字符
在交互模式下,将光标置于想要替换的字符上。按下 r 键,接着输入你要替换的字符即可。 撤销操作
如果要撤销最近的修改,只需要按下 u 键,如果想要撤销最近四次修改,可以按下4,再按下 u 。 重做
取消撤销,也就是重做之前的修改使用 ctrl + r 。 跳转到指定行
Vim 编辑的文件中,每一行都有一个行号,行号从1开始,逐一递增。行号默认是不显示,如果需要它显示的话,可以进入命令模式,然后输入
set nu ,如果要隐藏行号的话,使用 set nonu 。跳转到指定行:
数字+gg ,例如 7gg ,表示跳转到第7行。
要跳转到最后一行,按下 G 。
要跳转到第一行,按下 gg 。
高级操作
查找
处于交互模式下,按下 / 键,那么就进入查找模式,输入你要查找的字符串,然后按下回车。光标就会跳转到文件中下一个查找到的匹配处。如果字符串不存在,那么会显示 "pattern not found" 。n 跳转到下一个匹配项;
N 跳转到上一个匹配项。
[注意] 用斜杠来进行的查找是从当前光标处开始向文件尾搜索,如果你要从当前光标处开始,向文件头搜索则使用
? ,当然也可以先按下 gg 跳转到第一行在进行全文搜索。 查找并替换
替换光标所在行第一个匹配的字符串:
# 语法
:s/旧字符串/新字符串
# 实例
:s/one/two
替换光标所在行所有旧字符串为新字符串:
# 语法
:s/旧字符串/新字符串/g
替换第几行到第几行中所有字符串:
# 语法
:n,m s/旧字符串/新字符串/g
# 实例
:2,4 s/one/two/g
最常用的就是全文替换了:
# 语法
:%s/旧字符串/新字符串/g
合并文件
可以用冒号 +r ( :r ) 实现在光标处插入一个文件的内容。
:r filename # 可以用Tab键来自动补全另外一个文件的路径
分屏
Vim 有一个特别便捷的功能那就是分屏,可以同时打开好几个文件,分屏之后,屏幕每一块被称为一个 viewport ,表示“视口”。横向分屏
:sp 文件名
垂直分屏 :vsp 文件名
分屏模式下的快捷键
Ctrl + w 再加 Ctrl + w ,表示从一个 viewport 移动光标到另外一个 viewport ;
Ctrl + w 再加 “方向键”,就可以移动到这个方向所处的下一个视口了;
Ctrl + w 再加 + 号,表示扩大当前视口;
Ctrl + w 再加 - 号,表示缩小当前视口;
Ctrl + w 再加 = 号,表示平均当前视口;
Ctrl + w 再加 r 键,会反向调换视口位置;
Ctrl + w 再加 q 键,会关闭当前视口;
Ctrl + w 再加 o 键,会关闭除当前视口以外的所有视口;
运行外部命令 :!
在 :!Vim 中可以运行一些终端命令,只要先输入 :! ,然后接命令名称。例如:
:!ls # 在Vim中打开的文件所在的目录运行ls命令
可视模式
前面只讲了 Vim 的三种模式,其实还有一种模式叫做可视模式。进入它的三种方式(都是从交互模式开始):
v 字符可视模式,进入后配合方向键选中字符后,然后再按 d 键可以删除选中。
V 行可视模式,进入后光标所在行默认被选中,然后再按 d 键可以删除所在行。
Ctrl + v 块可视模式,它是可视模式最有用的功能了,配合 d 和 I 键可以实现删除选中的内容和插入内容。
同时选中多行,并在选中行头部插入内容的具体操作步骤:
1. ctrl + v 进入块可视模式
2. 使用方向键进行选中(上下左右)假设选中5行
3. 输入 I 键进行多行同时插入操作
4. 插入完成后连续按两下 esc 键,实现多行同时插入相同字符
进入可视模式之后的操作键:
d 键,表示删除选中;
I 键,表示在选中之前插入;
u 键,表示选中变为小写;
U 键,表示选中变为大写;
Vim 配置
选项参数
在 Vim 被启动后,可以运行一些指令来激活一些选项参数,但是这些选项参数的配置在退出 Vim 时会被忘记,例如前面讲解的激活行号。如果希望所在的配置是永久性的,那么需要在家目录( cd ~ )创建一个 Vim 的配置文件 .vimrc 。 .vimrc
set number " 显示行号
syntax on " 激活语法高亮
set showcmd " 实时看到输入的命令
set ignorecase " 搜索时不区分大小写
set mouse=a " 激活鼠标,用鼠标选中时相当于进入可视模式
Vim 配置非常丰富,我们可以通过个性化配置把 Vim 打造成属于自己的 IDE 等等。在 github 上也可以搜索到一些强大的 Vim 配置文件。Linux Shell感叹号的妙用
执行上一条命令
使用第一个参数
使用最后一个参数
去掉最后一个参数
使用所有的参数
获取指定位置的参数
删除尾路径和前导路径
使用history中的命令
执行倒数第N条命令
执行上次指定关键字开头的命令
执行包含指定关键字的命令
替换上次指令中的关键字
只查看不执行命令
总结
使用第一个参数
使用最后一个参数
去掉最后一个参数
使用所有的参数
获取指定位置的参数
删除尾路径和前导路径
使用history中的命令
执行倒数第N条命令
执行上次指定关键字开头的命令
执行包含指定关键字的命令
替换上次指令中的关键字
只查看不执行命令
总结
执行上一条命令
如果想执行上次的命令,我们除了可以在控制台输入方向键向上的按键外,还可以使用使用第一个参数
有时候我们输入了一长串的命令,有可能输入了很长的参数,然后再执行下一个命令的时候需要执行上一次的第一个参数,这个时候我们使用使用最后一个参数
与上面的相反,我们也可以使用去掉最后一个参数
如果想去掉上一个命令的最后一个参数,可以使用使用所有的参数
有时候我们不小心将命令输入错误了,但是又不想重复的输入,或者使用退格键按半天,那么就可以使用获取指定位置的参数
如果想获取到上一个命令指定第N个参数,可以使用删除尾路径和前导路径
我们可以移除路径的文件名,可以使用使用history中的命令
执行倒数第N条命令,可以使用!-N ,
如下所示:
执行上次指定关键字开头的命令
如果想执行上一条以指定开头的命令,可以使用执行包含指定关键字的命令
如果想执行上次包含指定关键字的命令,可以使用替换上次指令中的关键字
有时候我们输入了指令想重复执行,但是又想替换掉其中某些字符,可以使用只查看不执行命令
有时候我们不确定使用感叹号之后获得命令是否正确,可以使用总结
我们这里将上面所有的使用方法在此总结到一个表格中,方便大家查阅使用方法: 命令说明! !执行上次命令 !^使用上次命令的第一个参数 !$使用上次命令的最后一个参数 !:-使用上次命令(包含命令),但去掉最后一个参数 !*使用上次命令的所有参数 !:N使用上次命令的第N个参数 !command使用上次指令开头的命令 !command:N使用上次指定命令的第N个参数(也可以用于上述命令组合,如!command:^) !:N-M使用上次命令的第N-M的参数 !:1*使用上次命令的第1个参数开始的所有参数 !:1-$上同,使用上次命令的第1个参数到最后一个参数 !:1-使用上次命令的第1个参数到最后第二个参数的之间的所有参数 !:$:h使用上次命令的最后一个参数并移除尾随路径名 !:$:r使用上次命令的最后一个参数并移除后缀名 !N使用history中的第N个命令 !-N使用history中的最后第N个命令 !?command?使用上次指定关键词的命令 !%使用上次 !?command匹配的完整单词 !:gs/old/new替换上次命令中的关键词 !:g&如果上次替换成功,则使用上次替换的规则替换上一个命令中的关键词:p只查看并不执行感叹号替换后的命令(tar cvfz aaa.tar !tar:3-:p 并不会被执行)6款Linux常用远程连接工具
Xshell
xshell 是一个非常强大的安全终端模拟软件,它支持 SSH1, SSH2, 以及 Windows 平台的 TELNET 协议。Xshell 可以在 Windows 界面下用来访问远端不同系统下的服务器,从而比较好的达到远程控制终端的目的。 https://www.xshellcn.com/SecureCRT
SecureCRT 支持 SSH,同时支持 Telnet 和 rlogin 协议。SecureCRT 是一款用于连接运行包括 Windows、UNIX 和 VMS 的理想工具。通过使用内含的 VCP 命令行程序可以进行加密文件的传输,网工应该很熟这个软件,经常使用它连接设备。 https://www.vandyke.comWinSCP
WinSCP 是一个 Windows 环境下使用 SSH 的开源图形化 SFTP 工具客户端。同时支持 SCP 协议。它的主要功能就是在本地与远程计算机间安全地复制传输文件。 https://winscp.net/PuTTY
PuTTY 是 SSH 和 telnet 客户端,最初由 Simon Tatham 为 Windows 平台开发。用 MIT 许可证授权。包含的组件有:PuTTY, PuTTYgen,PSFTP, PuTTYtel, Plink, PSCP, Pageant, 默认登录协议是 SSH,默认的端口为 22。 Putty 主要是用来远程连接服务器,它支持 SSH、Telnet、Serial 等协议的连接。 http://www.putty.orgMobaXterm
mobaxterm 的功能非常全面,几乎提供了所有重要的远程网络工具(比如 SSH、X11、RDP、VNC、FTP、MOSH 等),以及 Windows 桌面上的 Unix 命令(bash、ls、cat、sed、grep、awk、rsync 等),登录之后默认开启 sftp 模式。 http://mobaxterm.mobatek.net 大多企业运维都喜欢用它FinalShell
FinalShell 是一体化的服务器网络管理软件 (java 语言编写),不仅是 ssh 客户端,FinalShell 还是功能强大的开发、运维工具,充分满足用户的开发运维需求。 http://www.hostbuf.com/ 可以直观的看出远程服务器的硬件运行情况Linux基础知识
操作系统
什么是Linux
终端连接阿里云服务器
Shell
命令
快捷方式
文件和目录
用户与权限
查找文件
软件仓库
阅读手册
文本操作
wc
uniq
cut
重定向 管道 流
查看进程
管理进程
守护进程
文件压缩解压
编译安装软件
网络
wget
备份
scp
rsync
系统
halt
reboot
poweroff
Vim 是什么?
Vim 常用模式
基本操作
标准操作
高级操作
Vim 配置
什么是Linux
终端连接阿里云服务器
Shell
命令
快捷方式
文件和目录
用户与权限
查找文件
软件仓库
阅读手册
文本操作
wc
uniq
cut
重定向 管道 流
查看进程
管理进程
守护进程
文件压缩解压
编译安装软件
网络
wget
备份
scp
rsync
系统
halt
reboot
poweroff
Vim 是什么?
Vim 常用模式
基本操作
标准操作
高级操作
Vim 配置
操作系统
操作系统Operating System 简称 OS ,是软件的一部分,它是硬件基础上的第一层软件,是硬件和其它软件沟通的桥梁。
操作系统会控制其他程序运行,管理系统资源,提供最基本的计算功能,如管理及配置内存、决定系统资源供需的优先次序等,同时还提供一些基本的服务程序。

什么是Linux
Linux 系统内核与 Linux 发行套件的区别Linux 系统内核指的是由 Linus Torvalds 负责维护,提供硬件抽象层、硬盘及文件系统控制及多任务功能的系统核心程序。
Linux 发行套件系统是我们常说的 Linux 操作系统,也即是由 Linux 内核与各种常用软件的集合产品。
总结:真正的 Linux 指的是系统内核,而我们常说的 Linux 指的是“发行版完整的包含一些基础软件的操作系统”。
Linux 对比 Windows
稳定且有效率;
免费(或少许费用);
漏洞少且快速修补;
多任务多用户;
更加安全的用户与文件权限策略;
适合小内核程序的嵌入系统;
相对不耗资源。
Linux 系统种类
红帽企业版 Linux :RHEL 是全世界内使用最广泛的 Linux 系统。它具有极强的性能与稳定性,是众多生成环境中使用的(收费的)系统。
Fedora :由红帽公司发布的桌面版系统套件,用户可以免费体验到最新的技术或工具,这些技术或工具在成熟后会被加入到 RHEL 系统中,因此 Fedora 也成为 RHEL 系统的试验版本。
CentOS :通过把RHEL 系统重新编译并发布给用户免费使用的 Linux 系统,具有广泛的使用人群。
Deepin :中国发行,对优秀的开源成品进行集成和配置。
Debian :稳定性、安全性强,提供了免费的基础支持,在国外拥有很高的认可度和使用率。
Ubuntu :是一款派生自 Debian 的操作系统,对新款硬件具有极强的兼容能力。Ubuntu 与 Fedora 都是极其出色的 Linux 桌面系统,而且 Ubuntu 也可用于服务器领域。
终端连接阿里云服务器
 通过执行
通过执行 ssh root@121.42.11.34 命令,然后输入服务器连接密码就可以顺利登录远程服务器。从现在开始我们就可以在本地电脑操作远程服务器。
这个黑色的面板就是终端也就是 Shell (命令行环境)。
ssh root@xxx 这是一条命令,必须要在 Shell 中才能执行。
Shell
Shell 这个单词的原意是“外壳”,跟 kernel(内核)相对应,比喻内核外面的一层,即用户跟内核交互的对话界面。
Shell 是一个程序,提供一个与用户对话的环境。这个环境只有一个命令提示符,让用户从键盘输入命令,所以又称为命令行环境( command line interface ,简写为 CLI )。Shell 接收到用户输入的命令,将命令送入操作系统执行,并将结果返回给用户。
Shell 是一个命令解释器,解释用户输入的命令。它支持变量、条件判断、循环操作等语法,所以用户可以用 Shell 命令写出各种小程序,又称为 Shell 脚本。这些脚本都通过 Shell 的解释执行,而不通过编译。
Shell 是一个工具箱,提供了各种小工具,供用户方便地使用操作系统的功能。
Shell 的种类
Shell 有很多种,只要能给用户提供命令行环境的程序,都可以看作是 Shell 。
历史上,主要的 Shell 有下面这些:
Bourne Shell(sh)
Bourne Again shell(bash)
C Shell(csh)
TENEX C Shell(tcsh)
Korn shell(ksh)
Z Shell(zsh)
Friendly Interactive Shell(fish)
其中 Bash 是目前最常用的 Shell 。MacOS 中的默认 Shell 就是 Bash 。
通过执行 echo $SHELL 命令可以查看到当前正在使用的 Shell 。还可以通过 cat /etc/shells 查看当前系统安装的所有 Shell 种类。
命令
命令行提示符 进入命令行环境以后,用户会看到Shell 的提示符。提示符往往是一串前缀,最后以一个美元符号 $ 结尾,用户可以在这个符号后面输入各种命令。
执行一个简单的命令 pwd:
[root@iZm5e8dsxce9ufaic7hi3uZ ~]# pwd
/root
命令解析:
root :表示用户名;
iZm5e8dsxce9ufaic7hi3uZ :表示主机名;
~ :表示目前所在目录为家目录,其中 root 用户的家目录是 /root 普通用户的家目录在 /home 下;
# :指示你所具有的权限(root 用户为 # ,普通用户为 $ )。
执行 whoami 命令可以查看当前用户名;
执行 hostname 命令可以查看当前主机名;
关于如何创建、切换、删除用户,在后面的用户与权限会具体讲解,这里先使用 root 用户进行演示。
[备注] root 是超级用户,具备操作系统的一切权限。
命令格式
command parameters(命令 参数)
长短参数
单个参数:ls -a(a 是英文 all 的缩写,表示“全部”)
多个参数:ls -al(全部文件 + 列表形式展示)
单个长参数:ls --all
多个长参数:ls --reverse --all
长短混合参数:ls --all -l
参数值
短参数:command -p 10(例如:ssh root@121.42.11.34 -p 22)
长参数:command --paramters=10(例如:ssh root@121.42.11.34 --port=22)
快捷方式
在开始学习Linux 命令之前,有这么一些快捷方式,是必须要提前掌握的,它将贯穿整个 Linux 使用生涯。
通过上下方向键 ↑ ↓ 来调取过往执行过的 Linux 命令;
命令或参数仅需输入前几位就可以用 Tab 键补全;
Ctrl + R :用于查找使用过的命令(history 命令用于列出之前使用过的所有命令,然后输入 ! 命令加上编号( !2 )就可以直接执行该历史命令);
Ctrl + L :清除屏幕并将当前行移到页面顶部;
Ctrl + C :中止当前正在执行的命令;
Ctrl + U :从光标位置剪切到行首;
Ctrl + K :从光标位置剪切到行尾;
Ctrl + W :剪切光标左侧的一个单词;
Ctrl + Y :粘贴 Ctrl + U | K | Y 剪切的命令;
Ctrl + A :光标跳到命令行的开头;
Ctrl + E :光标跳到命令行的结尾;
Ctrl + D :关闭 Shell 会话;
文件和目录
文件的组织 查看路径
pwd:显示当前目录的路径
查看路径
pwd:显示当前目录的路径
 which:查看命令的可执行文件所在路径,
Linux 下,每一条命令其实都对应一个可执行程序,在终端中输入命令,按回车的时候,就是执行了对应的那个程序,which 命令本身对应的程序也存在于 Linux 中。
总的来说一个命令就是一个可执行程序。
 浏览和切换目录
ls:列出文件和目录,它是
浏览和切换目录
ls:列出文件和目录,它是 Linux 最常用的命令之一。
【常用参数】
-a 显示所有文件和目录包括隐藏的
-l 显示详细列表
-h 适合人类阅读的
-t 按文件最近一次修改时间排序
-i 显示文件的 inode( inode 是文件内容的标识)
 cd:
cd:cd 是英语 change directory 的缩写,表示切换目录。
cd / --> 跳转到根目录
cd ~ --> 跳转到家目录
cd .. --> 跳转到上级目录
cd ./home --> 跳转到当前目录的home目录下
cd /home/lion --> 跳转到根目录下的home目录下的lion目录
cd --> 不添加任何参数,也是回到家目录
[注意] 输入 cd /ho 单次 tab 键会自动补全路径 + 两次 tab 键会列出所有可能的目录列表。
du:列举目录大小信息。
【常用参数】
-h 适合人类阅读的;
-a 同时列举出目录下文件的大小信息;
-s 只显示总计大小,不显示具体信息。
浏览和创建文件
cat:一次性显示文件所有内容,更适合查看小的文件。
cat cloud-init.log
【常用参数】
-n 显示行号。
less:分页显示文件内容,更适合查看大的文件。
less cloud-init.log
【快捷操作】
空格键:前进一页(一个屏幕);
b 键:后退一页;
回车键:前进一行;
y 键:后退一行;
上下键:回退或前进一行;
d 键:前进半页;
u 键:后退半页;
q 键:停止读取文件,中止 less 命令;
= 键:显示当前页面的内容是文件中的第几行到第几行以及一些其它关于本页内容的详细信息;
h 键:显示帮助文档;
/ 键:进入搜索模式后,按 n 键跳到一个符合项目,按 N 键跳到上一个符合项目,同时也可以输入正则表达式匹配。
head:显示文件的开头几行(默认是10行)
head cloud-init.log
【参数】
-n 指定行数 head cloud-init.log -n 2
tail:显示文件的结尾几行(默认是10行)
tail cloud-init.log
【参数】
-n 指定行数 tail cloud-init.log -n 2
-f 会每过1秒检查下文件是否有更新内容,也可以用 -s 参数指定间隔时间 tail -f -s 4 xxx.log
touch:创建一个文件
touch new_file
mkdir:创建一个目录
mkdir new_folder
【常用参数】
-p 递归的创建目录结构 mkdir -p one/two/three
文件的复制和移动
cp:拷贝文件和目录
cp file file_copy	--> file 是目标文件,file_copy 是拷贝出来的文件
cp file one	--> 把 file 文件拷贝到 one 目录下,并且文件名依然为 file
cp file one/file_copy	--> 把 file 文件拷贝到 one 目录下,文件名为file_copy
cp *.txt folder	--> 把当前目录下所有 txt 文件拷贝到 folder 目录下
【常用参数】
-r 递归的拷贝,常用来拷贝一整个目录
mv:移动(重命名)文件或目录,与cp命令用法相似。
mv file one	--> 将 file 文件移动到 one 目录下
mv new_folder one	--> 将 new_folder 文件夹移动到one目录下
mv *.txt folder	--> 把当前目录下所有 txt 文件移动到 folder 目录下
mv file new_file	--> file 文件重命名为 new_file
文件的删除和链接
rm:删除文件和目录,由于 Linux 下没有回收站,一旦删除非常难恢复,因此需要谨慎操作
rm new_file 	--> 删除 new_file 文件
rm f1 f2 f3 	--> 同时删除 f1 f2 f3 3个文件
【常用参数】
-i 向用户确认是否删除;
-f 文件强制删除;
-r 递归删除文件夹,著名的删除操作 rm -rf 。
ln:英文 Link 的缩写,表示创建链接。
学习创建链接之前,首先要理解链接是什么,我们先来看看 Linux 的文件是如何存储的:
Linux 文件的存储方式分为3个部分,文件名、文件内容以及权限,其中文件名的列表是存储在硬盘的其它地方和文件内容是分开存放的,每个文件名通过 inode 标识绑定到文件内容。
Linux 下有两种链接类型:硬链接和软链接。
具体可以看文章:彻底明白Linux硬链接和软链接
硬链接
使链接的两个文件共享同样文件内容,就是同样的 inode ,一旦文件1和文件2之间有了硬链接,那么修改任何一个文件,修改的都是同一块内容,它的缺点是,只能创建指向文件的硬链接,不能创建指向目录的(其实也可以,但比较复杂)而软链接都可以,因此软链接使用更加广泛。
ln file1 file2 --> 创建 file2 为 file1 的硬链接
 如果我们用 rm file1 来删除 file1 ,对 file2 没有什么影响,对于硬链接来说,删除任意一方的文件,共同指向的文件内容并不会从硬盘上删除。只有同时删除了 file1 与 file2 后,它们共同指向的文件内容才会消失。
软链接
软链接就类似 windows 下快捷方式。
如果我们用 rm file1 来删除 file1 ,对 file2 没有什么影响,对于硬链接来说,删除任意一方的文件,共同指向的文件内容并不会从硬盘上删除。只有同时删除了 file1 与 file2 后,它们共同指向的文件内容才会消失。
软链接
软链接就类似 windows 下快捷方式。
ln -s file1 file2
 执行
执行 ls -l 命名查看当前目录下文件的具体信息
total 0
-rw-r--r-- 1 root root 0 Jan 14 06:29 file1
lrwxrwxrwx 1 root root 5 Jan 14 06:42 file2 -> file1  # 表示file2 指向 file1
其实 file2 只是 file1 的一个快捷方式,它指向的是 file1 ,所以显示的是 file1 的内容,但其实 file2 的 inode 与 file1 并不相同。如果我们删除了 file2 的话,file1 是不会受影响的,但如果删除 file1 的话, file2 就会变成死链接,因为指向的文件不见了。
用户与权限
用户Linux 是一个多用户的操作系统。在 Linux 中,理论上来说,我们可以创建无数个用户,但是这些用户是被划分到不同的群组里面的,有一个用户,名叫 root ,是一个很特殊的用户,它是超级用户,拥有最高权限。
 自己创建的用户是有限权限的用户,这样大大提高了
 Linux 系统的安全性,有效防止误操作或是病毒攻击,但是我们执行的某些命令需要更高权限时可以使用 sudo 命令。
sudo:以 root 身份运行命令
sudo date --> 当然查看日期是不需要sudo的这里只是演示,sudo 完之后一般还需要输入用户密码的
useradd + passwd
useradd 添加新用户
passwd 修改用户密码
这两个命令需要 root 用户权限
useradd lion	--> 添加一个lion用户,添加完之后在 /home 路径下可以查看
passwd lion	--> 修改lion用户的密码
userdel:删除用户,需要 root 用户权限
userdel lion	--> 只会删除用户名,不会从/home中删除对应文件夹
userdel lion -r	--> 会同时删除/home下的对应文件夹
su:切换用户,需要 root 用户权限
sudo su	--> 切换为root用户(exit 命令或 CTRL + D 快捷键都可以使普通用户切换为 root 用户)
su lion	--> 切换为普通用户
su -	--> 切换为root用户
群组的管理
Linux 中每个用户都属于一个特定的群组,如果你不设置用户的群组,默认会创建一个和它的用户名一样的群组,并且把用户划归到这个群组。
groupadd:创建群组,用法和 useradd 类似。
groupadd friends
groupdel:删除一个已存在的群组
groupdel foo --> 删除foo群组
groups:查看用户所在群组
groups lion --> 查看 lion 用户所在的群组
usermod:用于修改用户的账户。
【常用参数】
-l 对用户重命名。需要注意的是 /home 中的用户家目录的名字不会改变,需要手动修改。
-g 修改用户所在的群组,例如 usermod -g friends lion 修改 lion 用户的群组为 friends 。
-G 一次性让用户添加多个群组,例如 usermod -G friends,foo,bar lion 。
-a -G 会让你离开原先的群组,如果你不想这样做的话,就得再添加 -a 参数,意味着 append 追加的意思。
chgrp:用于修改文件的群组。
chgrp bar file.txt --> file.txt文件的群组修改为bar
chown:改变文件的所有者,需要 root 身份才能运行。
chown lion file.txt	--> 把其它用户创建的file.txt转让给lion用户
chown lion:bar file.txt	--> 把file.txt的用户改为lion,群组改为bar
【常用参数】
-R 递归设置子目录和子文件,chown -R lion:lion /home/frank 把 frank 文件夹的用户和群组都改为 lion 。
文件权限管理
chmod:修改访问权限。
chmod 740 file.txt
【常用参数】
-R 可以递归地修改文件访问权限,例如 chmod -R 777 /home/lion
修改权限的确简单,但是理解其深层次的意义才是更加重要的。下面我们来系统的学习 Linux 的文件权限。
[root@lion ~]# ls -l
drwxr-xr-x 5 root root 4096 Apr 13  2020 climb
lrwxrwxrwx 1 root root    7 Jan 14 06:41 hello2.c -> hello.c
-rw-r--r-- 1 root root  149 Jan 13 06:14 hello.c
其中 drwxr-xr-x 表示文件或目录的权限。让我们一起来解读它具体代表什么?
d :表示目录,就是说这是一个目录,普通文件是 - ,链接是 l 。
r :read 表示文件可读。
w :write 表示文件可写,一般有写的权限,就有删除的权限。
x :execute 表示文件可执行。
- :表示没有相应权限。
权限的整体是按用户来划分的,如下图所示:
 现在再来理解这句权限
 drwxr-xr-x 的意思:
它是一个文件夹;
它的所有者具有:读、写、执行权限;
它的群组用户具有:读、执行的权限,没有写的权限;
它的其它用户具有:读、执行的权限,没有写的权限。
现在理解了权限,我们使用 chmod 来尝试修改权限。chmod 它不需要是 root 用户才能运行的,只要你是此文件所有者,就可以用 chmod 来修改文件的访问权限。
数字分配权限
| 权限 | 数字 |
|---|---|
| r | 4 |
| w | 2 |
| x | 1 |
chmod 640 hello.c

# 分析
6 = 4 + 2 + 0 表示所有者具有 rw 权限
4 = 4 + 0 + 0 表示群组用户具有 r 权限
0 = 0 + 0 + 0 表示其它用户没有权限

对应文字权限为:-rw-r-----
用字母来分配权限
u :user 的缩写,用户的意思,表示所有者。
g :group 的缩写,群组的意思,表示群组用户。
o :other 的缩写,其它的意思,表示其它用户。
a :all 的缩写,所有的意思,表示所有用户。
+ :加号,表示添加权限。
- :减号,表示去除权限。
= :等于号,表示分配权限。
chmod u+rx file	--> 文件file的所有者增加读和运行的权限
chmod g+r file	--> 文件file的群组用户增加读的权限
chmod o-r file	--> 文件file的其它用户移除读的权限
chmod g+r o-r file	--> 文件file的群组用户增加读的权限,其它用户移除读的权限
chmod go-r file	--> 文件file的群组和其他用户移除读的权限
chmod +x file	--> 文件file的所有用户增加运行的权限
chmod u=rwx,g=r,o=- file	--> 文件file的所有者分配读写和执行的权限,群组其它用户分配读的权限,其他用户没有任何权限
查找文件
locate:搜索包含关键字的所有文件和目录。后接需要查找的文件名,也可以用正则表达式。 安装locateyum -y install mlocate --> 安装包
updatedb --> 更新数据库
locate file.txt
locate fil*.txt
[注意] locate 命令会去文件数据库中查找命令,而不是全磁盘查找,因此刚创建的文件并不会更新到数据库中,所以无法被查找到,可以执行 updatedb 命令去更新数据库。
find:用于查找文件,它会去遍历你的实际硬盘进行查找,而且它允许我们对每个找到的文件进行后续操作,功能非常强大。
find <何处> <何物> <做什么>
何处:指定在哪个目录查找,此目录的所有子目录也会被查找。
何物:查找什么,可以根据文件的名字来查找,也可以根据其大小来查找,还可以根据其最近访问时间来查找。
做什么:找到文件后,可以进行后续处理,如果不指定这个参数, find 命令只会显示找到的文件。
根据文件名查找
find -name "file.txt"	--> 当前目录以及子目录下通过名称查找文件
find . -name "syslog"	--> 当前目录以及子目录下通过名称查找文件
find / -name "syslog"	--> 整个硬盘下查找syslog
find /var/log -name "syslog"	--> 在指定的目录/var/log下查找syslog文件
find /var/log -name "syslog*"	--> 查找syslog1、syslog2 ... 等文件,通配符表示所有
find /var/log -name "*syslog*"	--> 查找包含syslog的文件
[注意] find 命令只会查找完全符合 “何物” 字符串的文件,而 locate 会查找所有包含关键字的文件。
根据文件大小查找
find /var -size +10M	--> /var 目录下查找文件大小超过 10M 的文件
find /var -size -50k	--> /var 目录下查找文件大小小于 50k 的文件
find /var -size +1G	--> /var 目录下查找文件大小查过 1G 的文件
find /var -size 1M	--> /var 目录下查找文件大小等于 1M 的文件
根据文件最近访问时间查找
find -name "*.txt" -atime -7 --> 近 7天内访问过的.txt结尾的文件
仅查找目录或文件
find . -name "file" -type f 	--> 只查找当前目录下的file文件
find . -name "file" -type d 	--> 只查找当前目录下的file目录
操作查找结果
find -name "*.txt" -printf "%p - %u\n"	--> 找出所有后缀为txt的文件,并按照 %p - %u\n 格式打印,其中%p=文件名,%u=文件所有者
find -name "*.jpg" -delete	--> 删除当前目录以及子目录下所有.jpg为后缀的文件,不会有删除提示,因此要慎用
find -name "*.c" -exec chmod 600 {} \;	--> 对每个.c结尾的文件,都进行 -exec 参数指定的操作,{} 会被查找到的文件替代,\; 是必须的结尾
find -name "*.c" -ok chmod 600 {} \;	--> 和上面的功能一直,会多一个确认提示
软件仓库
Linux 下软件是以包的形式存在,一个软件包其实就是软件的所有文件的压缩包,是二进制的形式,包含了安装软件的所有指令。Red Hat 家族的软件包后缀名一般为 .rpm , Debian 家族的软件包后缀是 .deb 。 Linux 的包都存在一个仓库,叫做软件仓库,它可以使用 yum 来管理软件包, yum 是 CentOS 中默认的包管理工具,适用于 Red Hat 一族。可以理解成 Node.js 的 npm 。 yum 常用命令yum update | yum upgrade 更新软件包
yum search xxx 搜索相应的软件包
yum install xxx 安装软件包
yum remove xxx 删除软件包
切换 CentOS 软件源
有时候 CentOS 默认的 yum 源不一定是国内镜像,导致 yum 在线安装及更新速度不是很理想。这时候需要将 yum 源设置为国内镜像站点。国内主要开源的镜像站点是网易和阿里云。
1、首先备份系统自带 yum 源配置文件 mv /etc/yum.repos.d/CentOS-Base.repo /etc/yum.repos.d/CentOS-Base.repo.backup
2、下载阿里云的 yum 源配置文件到 /etc/yum.repos.d/CentOS7
wget -O /etc/yum.repos.d/CentOS-Base.repo http://mirrors.aliyun.com/repo/Centos-7.repo
3、生成缓存
yum makecache
阅读手册
Linux 命令种类繁杂,我们凭借记忆不可能全部记住,因此学会查用手册是非常重要的。 man 安装更新 mansudo yum install -y man-pages --> 安装
sudo mandb --> 更新
man 手册种类
可执行程序或 Shell 命令;
系统调用( Linux 内核提供的函数);
库调用(程序库中的函数);
文件(例如 /etc/passwd );
特殊文件(通常在 /dev 下);
游戏;
杂项(man(7) ,groff(7) );
系统管理命令(通常只能被 root 用户使用);
内核子程序。
man + 数字 + 命令
输入 man + 数字 + 命令/函数,可以查到相关的命令和函数,若不加数字, man 默认从数字较小的手册中寻找相关命令和函数
man 3 rand 	--> 表示在手册的第三部分查找 rand 函数
man ls 			--> 查找 ls 用法手册
man 手册核心区域解析:(以 man pwd 为例)
NAME # 命令名称和简单描述
     pwd -- return working directory name

SYNOPSIS # 使用此命令的所有方法
     pwd [-L | -P]

DESCRIPTION # 包括所有参数以及用法
     The pwd utility writes the absolute pathname of the current working directory to the standard output.

     Some shells may provide a builtin pwd command which is similar or identical to this utility.  Consult the builtin(1) manual page.

     The options are as follows:

     -L      Display the logical current working directory.

     -P      Display the physical current working directory (all symbolic links resolved).

     If no options are specified, the -L option is assumed.

SEE ALSO # 扩展阅读相关命令
     builtin(1), cd(1), csh(1), sh(1), getcwd(3)
help
man 命令像新华词典一样可以查询到命令或函数的详细信息,但其实我们还有更加快捷的方式去查询,command --help 或 command -h ,它没有 man 命令显示的那么详细,但是它更加易于阅读。
Linux 进阶
文本操作
grep 全局搜索一个正则表达式,并且打印到屏幕。简单来说就是,在文件中查找关键字,并显示关键字所在行。 基础语法grep text file # text代表要搜索的文本,file代表供搜索的文件
# 实例
[root@lion ~]# grep path /etc/profile
pathmunge () {
pathmunge /usr/sbin
pathmunge /usr/local/sbin
pathmunge /usr/local/sbin after
pathmunge /usr/sbin after
unset -f pathmunge
常用参数
-i 忽略大小写,grep -i path /etc/profile
-n 显示行号, grep -i path /etc/profile
-v 只显示搜索文本不在的那些行,grep -v path /etc/profile
-r 递归查找,grep -r hello /etc ,Linux 中还有一个 rgrep 命令,作用相当于 grep -r
高级用法
grep 可以配合正则表达式使用。
grep -E path /etc/profile --> 完全匹配path
grep -E ^path /etc/profile --> 匹配path开头的字符串
grep -E [Pp]ath /etc/profile --> 匹配path或Path
sort
对文件的行进行排序。
基础语法
sort name.txt # 对name.txt文件进行排序
实例用法
为了演示方便,我们首先创建一个文件 name.txt ,放入以下内容:
Christopher
Shawn
Ted
Rock
Noah
Zachary
Bella
执行 sort name.txt 命令,会对文本内容进行排序。
常用参数
-o 将排序后的文件写入新文件,sort -o name_sorted.txt name.txt ;
-r 倒序排序,sort -r name.txt ;
-R 随机排序,sort -R name.txt ;
-n 对数字进行排序,默认是把数字识别成字符串的,因此 138 会排在 25 前面,如果添加了 -n 数字排序的话,则 25 会在 138 前面。
wc
word count 的缩写,用于文件的统计。它可以统计单词数目、行数、字符数,字节数等。
基础语法
wc name.txt # 统计name.txt
实例用法
[root@lion ~]# wc name.txt
13 13 91 name.txt
第一个13,表示行数;
第二个13,表示单词数;
第三个91,表示字节数。
常用参数
-l 只统计行数, wc -l name.txt ;
-w 只统计单词数,wc -w name.txt ;
-c 只统计字节数,wc -c name.txt ;
-m 只统计字符数,wc -m name.txt 。
uniq
删除文件中的重复内容。 基础语法uniq name.txt # 去除name.txt重复的行数,并打印到屏幕上
uniq name.txt uniq_name.txt # 把去除重复后的文件保存为 uniq_name.txt
【注意】它只能去除连续重复的行数。
常用参数
-c 统计重复行数, uniq -c name.txt;
-d 只显示重复的行数, uniq -d name.txt 。
cut
剪切文件的一部分内容。 基础语法cut -c 2-4 name.txt # 剪切每一行第二到第四个字符
常用参数
-d 用于指定用什么分隔符(比如逗号、分号、双引号等等)cut -d , name.txt ;
-f 表示剪切下用分隔符分割的哪一块或哪几块区域,cut -d , -f 1 name.txt 。
重定向 管道 流
在 Linux 中一个命令的去向可以有3个地方:终端、文件、作为另外一个命令的入参。 命令一般都是通过键盘输入,然后输出到终端、文件等地方,它的标准用语是 stdin 、 stdout 以及 stderr 。
标准输入
命令一般都是通过键盘输入,然后输出到终端、文件等地方,它的标准用语是 stdin 、 stdout 以及 stderr 。
标准输入 stdin ,终端接收键盘输入的命令,会产生两种输出;
标准输出 stdout ,终端输出的信息(不包含错误信息);
标准错误输出 stderr ,终端输出的错误信息。
 重定向
把本来要显示在终端的命令结果,输送到别的地方(到文件中或者作为其他命令的输入)。
输出重定向 >
重定向
把本来要显示在终端的命令结果,输送到别的地方(到文件中或者作为其他命令的输入)。
输出重定向 >
> 表示重定向到新的文件,cut -d , -f 1 notes.csv > name.csv ,它表示通过逗号剪切 notes.csv 文件(剪切完有3个部分)获取第一个部分,重定向到 name.csv 文件。
我们来看一个具体示例,学习它的使用,假设我们有一个文件 notes.csv ,文件内容如下:
Mark1,951/100,很不错1
Mark2,952/100,很不错2
Mark3,953/100,很不错3
Mark4,954/100,很不错4
Mark5,955/100,很不错5
Mark6,956/100,很不错6
执行命令:cut -d , -f 1 notes.csv > name.csv 最后输出如下内容:
Mark1
Mark2
Mark3
Mark4
Mark5
Mark6
【注意】使用 > 要注意,如果输出的文件不存在它会新建一个,如果输出的文件已经存在,则会覆盖。因此执行这个操作要非常小心,以免覆盖其它重要文件。
输出重定向 >>
表示重定向到文件末尾,因此它不会像 > 命令这么危险,它是追加到文件的末尾(当然如果文件不存在,也会被创建)。
再次执行cut -d , -f 1 notes.csv >> name.csv,则会把名字追加到 name.csv 里面。
Mark1
Mark2
Mark3
Mark4
Mark5
Mark6
Mark1
Mark2
Mark3
Mark4
Mark5
Mark6
我们平时读的 log 日志文件其实都是用这个命令输出的。
输出重定向 2>
标准错误输出
cat not_exist_file.csv > res.txt 2> errors.log
当我们 cat 一个文件时,会把文件内容打印到屏幕上,这个是标准输出;
当使用了 > res.txt 时,则不会打印到屏幕,会把标准输出写入文件 res.txt 文件中;
2> errors.log 当发生错误时会写入 errors.log 文件中。
输出重定向 2>>
标准错误输出(追加到文件末尾)同 >> 相似。
输出重定向 2>&1
标准输出和标准错误输出都重定向都一个地方
cat not_exist_file.csv > res.txt 2>&1  # 覆盖输出
cat not_exist_file.csv >> res.txt 2>&1 # 追加输出
目前为止,我们接触的命令的输入都来自命令的参数,其实命令的输入还可以来自文件或者键盘的输入。
 输入重定向
输入重定向 <
< 符号用于指定命令的输入。
cat < name.csv # 指定命令的输入为 name.csv
虽然它的运行结果与 cat name.csv 一样,但是它们的原理却完全不同。
cat name.csv 表示 cat 命令接收的输入是 notes.csv 文件名,那么要先打开这个文件,然后打印出文件内容。
cat < name.csv 表示 cat 命令接收的输入直接是 notes.csv 这个文件的内容, cat 命令只负责将其内容打印,打开文件并将文件内容传递给 cat 命令的工作则交给终端完成。
输入重定向 <<
将键盘的输入重定向为某个命令的输入。
sort -n << END # 输入这个命令之后,按下回车,终端就进入键盘输入模式,其中END为结束命令(这个可以自定义)

wc -m << END # 统计输入的单词
管道 |
把两个命令连起来使用,一个命令的输出作为另外一个命令的输入,英文是 pipeline ,可以想象一个个水管连接起来,管道算是重定向流的一种。
 举几个实际用法案例:
cut -d , -f 1 name.csv | sort > sorted_name.txt
# 第一步获取到的 name 列表,通过管道符再进行排序,最后输出到sorted_name.txt

du | sort -nr | head
# du 表示列举目录大小信息
# sort 进行排序,-n 表示按数字排序,-r 表示倒序
# head 前10行文件

grep log -Ir /var/log | cut -d : -f 1 | sort | uniq
# grep log -Ir /var/log 表示在log文件夹下搜索 /var/log 文本,-r 表示递归,-I 用于排除二进制文件
# cut -d : -f 1 表示通过冒号进行剪切,获取剪切的第一部分
# sort 进行排序
# uniq 进行去重
流
流并非一个命令,在计算机科学中,流 stream 的含义是比较难理解的,记住一点即可:流就是读一点数据, 处理一点点数据。其中数据一般就是二进制格式。上面提及的重定向或管道,就是把数据当做流去运转的。
到此我们就接触了,流、重定向、管道等 Linux 高级概念及指令。其实你会发现关于流和管道在其它语言中也有广泛的应用。Angular 中的模板语法中可以使用管道。Node.js 中也有 stream 流的概念。
查看进程
在 Windows 中通过 Ctrl + Alt + Delete 快捷键查看软件进程。 w 帮助我们快速了解系统中目前有哪些用户登录着,以及他们在干什么。[root@lion ~]# w
06:31:53 up 25 days, 9:53, 1 user, load average: 0.00, 0.01, 0.05
USER TTY FROM LOGIN@ IDLE JCPU PCPU WHAT
root pts/0 118.31.243.53 05:56 1.00s 0.02s 0.00s w
06:31:53:表示当前时间
up 25 days, 9:53:表示系统已经正常运行了“25天9小时53分钟”
1 user:表示一个用户
load average: 0.00, 0.01, 0.05:表示系统的负载,3个值分别表示“1分钟的平均负载”,“5分钟的平均负载”,“15分钟的平均负载”
USER:表示登录的用于
TTY:登录的终端名称为pts/0
FROM:连接到服务器的ip地址
LOGIN@:登录时间
IDLE:用户有多久没有活跃了
JCPU:该终端所有相关的进程使用的 CPU 时间,每当进程结束就停止计时,开始新的进程则会重新计时
PCPU:表示 CPU 执行当前程序所消耗的时间,当前进程就是在 WHAT 列里显示的程序
WHAT:表示当下用户正运行的程序是什么,这里我运行的是 w
ps
用于显示当前系统中的进程, ps 命令显示的进程列表不会随时间而更新,是静态的,是运行 ps 命令那个时刻的状态或者说是一个进程快照。
基础语法
[root@lion ~]# ps
  PID TTY          TIME CMD
 1793 pts/0    00:00:00 bash
 4756 pts/0    00:00:00 ps

 PID:进程号,每个进程都有唯一的进程号
 TTY:进程运行所在的终端
 TIME:进程运行时间
 CMD:产生这个进程的程序名,如果在进程列表中看到有好几行都是同样的程序名,那么就是同样的程序产生了不止一个进程
常用参数
-ef 列出所有进程;
-efH 以乔木状列举出所有进程;
-u 列出此用户运行的进程;
-aux 通过 CPU 和内存使用来过滤进程 ps -aux | less ;
-aux --sort -pcpu 按 CPU 使用降序排列,-aux --sort -pmem 表示按内存使用降序排列;
-axjf 以树形结构显示进程, ps -axjf 它和 pstree 效果类似。
top
获取进程的动态列表。
top - 07:20:07 up 25 days, 10:41,  1 user,  load average: 0.30, 0.10, 0.07
Tasks:  67 total,   1 running,  66 sleeping,   0 stopped,   0 zombie
%Cpu(s):  0.7 us,  0.3 sy,  0.0 ni, 99.0 id,  0.0 wa,  0.0 hi,  0.0 si,  0.0 st
KiB Mem :  1882072 total,   552148 free,   101048 used,  1228876 buff/cache
KiB Swap:        0 total,        0 free,        0 used.  1594080 avail Mem

  PID USER      PR  NI    VIRT    RES    SHR S %CPU %MEM     TIME+ COMMAND
  956 root      10 -10  133964  15848  10240 S  0.7  0.8 263:13.01 AliYunDun
    1 root      20   0   51644   3664   2400 S  0.0  0.2   3:23.63 systemd
    2 root      20   0       0      0      0 S  0.0  0.0   0:00.05 kthreadd
    4 root       0 -20       0      0      0 S  0.0  0.0   0:00.00 kworker/0:0H
top - 07:20:07 up 25 days, 10:41, 1 user, load average: 0.30, 0.10, 0.07 相当 w 命令的第一行的信息。
展示的这些进程是按照使用处理器 %CPU 的使用率来排序的。
kill
结束一个进程,kill + PID 。
kill 956 # 结束进程号为956的进程
kill 956 957 # 结束多个进程
kill -9 7291 # 强制结束进程
管理进程
进程状态 主要是切换进程的状态。我们先了解下 Linux 下进程的五种状态: 状态码 R :表示正在运行的状态; 状态码 S :表示中断(休眠中,受阻,当某个条件形成后或接受到信号时,则脱离该状态); 状态码 D :表示不可中断(进程不响应系统异步信号,即使用kill命令也不能使其中断); 状态码 Z :表示僵死(进程已终止,但进程描述符依然存在,直到父进程调用 wait4() 系统函数后将进程释放); 状态码 T :表示停止(进程收到 SIGSTOP 、 SIGSTP 、 SIGTIN 、 SIGTOU 等停止信号后停止运行)。 前台进程 & 后台进程 默认情况下,用户创建的进程都是前台进程,前台进程从键盘读取数据,并把处理结果输出到显示器。例如运行 top 命令,这就是一个一直运行的前台进程。 后台进程的优点是不必等待程序运行结束,就可以输入其它命令。在需要执行的命令后面添加 & 符号,就表示启动一个后台进程。 & 启动后台进程,它的缺点是后台进程与终端相关联,一旦关闭终端,进程就自动结束了。cp name.csv name-copy.csv &
nohup
使进程不受挂断(关闭终端等动作)的影响。
nohup cp name.csv name-copy.csv
nohup 命令也可以和 & 结合使用。
nohup cp name.csv name-copy.csv &
bg
使一个“后台暂停运行”的进程,状态改为“后台运行”。
bg %1 # 不加任何参数的情况下,bg命令会默认作用于最近的一个后台进程,如果添加参数则会作用于指定标号的进程
实际案例1:
1. 执行 grep -r "log" / > grep_log 2>&1 命令启动一个前台进程,并且忘记添加 & 符号
2. ctrl + z 使进程状态转为后台暂停
3. 执行 bg 将命令转为后台运行
实际案例2:
前端开发时我们经常会执行 yarn start 启动项目
此时我们执行 ctrl + z 先使其暂停
然后执行 bg 使其转为后台运行
这样当前终端就空闲出来可以干其它事情了,如果想要唤醒它就使用 fg 命令即可(后面会讲)
jobs
显示当前终端后台进程状态。
fg
fg 使进程转为前台运行,用法和 bg 命令类似。
我们用一张图来表示前后台进程切换:
 我们可以使程序在后台运行,成为后台进程,这样在当前终端中我们就可以做其他事情了,而不必等待此进程运行结束。
守护进程
一个运行起来的程序被称为进程。在 Linux 中有些进程是特殊的,它不与任何进程关联,不论用户的身份如何,都在后台运行,这些进程的父进程是 PID 为1的进程, PID 为1的进程只在系统关闭时才会被销毁。它们会在后台一直运行等待分配工作。我们将这类进程称之为守护进程 daemon 。 守护进程的名字通常会在最后有一个 d ,表示 daemon 守护的意思,例如 systemd 、httpd 。 systemd systemd 是一个 Linux 系统基础组件的集合,提供了一个系统和服务管理器,运行为 PID 1 并负责启动其它程序。 通过命令也可以看到 PID 为1的进程就是 systemd 的系统进程。 systemd 常用命令(它是一组命令的集合):systemctl start nginx # 启动服务
systemctl stop nginx # 停止服务
systemctl restart nginx # 重启服务
systemctl status nginx # 查看服务状态
systemctl reload nginx # 重载配置文件(不停止服务的情况)
systemctl enable nginx # 开机自动启动服务
systemctl disable nginx # 开机不自动启动服务
systemctl is-enabled nginx # 查看服务是否开机自动启动
systemctl list-unit-files --type=service # 查看各个级别下服务的启动和禁用情况
文件压缩解压
打包:是将多个文件变成一个总的文件,它的学名叫存档、归档。 压缩:是将一个大文件(通常指归档)压缩变成一个小文件。 我们常常使用 tar 将多个文件归档为一个总的文件,称为 archive 。然后用 gzip 或 bzip2 命令将 archive 压缩为更小的文件。 tar
创建一个
tar
创建一个 tar 归档。
基础用法
tar -cvf sort.tar sort/ # 将sort文件夹归档为sort.tar
tar -cvf archive.tar file1 file2 file3 # 将 file1 file2 file3 归档为archive.tar
常用参数
-cvf 表示 create(创建)+ verbose(细节)+ file(文件),创建归档文件并显示操作细节;
-tf 显示归档里的内容,并不解开归档;
-rvf 追加文件到归档,tar -rvf archive.tar file.txt ;
-xvf 解开归档,tar -xvf archive.tar 。
gzip / gunzip
“压缩/解压”归档,默认用 gzip 命令,压缩后的文件后缀名为 .tar.gz 。
tar 归档+压缩
可以用 tar 命令同时完成归档和压缩的操作,就是给 tar 命令多加一个选项参数,使之完成归档操作后,还是调用 gzip 或 bzip2 命令来完成压缩操作。
zcat、zless、zmore
之前讲过使用 cat less more 可以查看文件内容,但是压缩文件的内容是不能使用这些命令进行查看的,而要使用 zcat、zless、zmore 进行查看。
zip/unzip
“压缩/解压” zip 文件( zip 压缩文件一般来自 windows 操作系统)。
命令安装
# Red Hat 一族中的安装方式
yum install zip
yum install unzip
基础用法
unzip archive.zip # 解压 .zip 文件
unzip -l archive.zip # 不解开 .zip 文件,只看其中内容

zip -r sort.zip sort/ # 将sort文件夹压缩为 sort.zip,其中-r表示递归
编译安装软件
之前我们学会了使用yum 命令进行软件安装,如果碰到 yum 仓库中没有的软件,我们就需要会更高级的软件安装“源码编译安装”。
编译安装
简单来说,编译就是将程序的源代码转换成可执 yum 行文件的过程。大多数 Linux 的程序都是开放源码的,可以编译成适合我们的电脑和操纵系统属性的可执行文件。
基本步骤如下:
下载源代码
解压压缩包
配置
编译
安装
实际案例
1、下载
我们来编译安装 htop 软件,首先在它的官网下载源码:https://bintray.com/htop/source/htop#files
下载好的源码在本机电脑上使用如下命令同步到服务器上:
scp 文件名 用户名@服务器ip:目标路径

scp ~/Desktop/htop-3.0.0.tar.gz root@121.42.11.34:.
也可以使用 wegt 进行下载:
wegt+下载地址

wegt https://bintray.com/htop/source/download_file?file_path=htop-3.0.0.tar.gz
2、解压文件
tar -zxvf htop-3.0.0.tar.gz # 解压

cd htop-3.0.0 # 进入目录
3、配置
执行 ./configure ,它会分析你的电脑去确认编译所需的工具是否都已经安装了。
4、编译
执行 make 命令
5、安装
执行 make install 命令,安装完成后执行 ls /usr/local/bin/ 查看是否有 htop 命令。如果有就可以执行 htop 命令查看系统进程了。
网络
ifconfig 查看 ip 网络相关信息,如果命令不存在的话, 执行命令yum install net-tools 安装。
参数解析:
eth0 对应有线连接(对应你的有线网卡),就是用网线来连接的上网。eth 是 Ethernet 的缩写,表示“以太网”。有些电脑可能同时有好几条网线连着,例如服务器,那么除了eth0 ,你还会看到 eth1 、eth2 等。
lo 表示本地回环( Local Loopback 的缩写,对应一个虚拟网卡)可以看到它的 ip 地址是 127.0.0.1 。每台电脑都应该有这个接口,因为它对应着“连向自己的链接”。这也是被称之为“本地回环”的原因。所有经由这个接口发送的东西都会回到你自己的电脑。看起来好像并没有什么用,但有时为了某些缘故,我们需要连接自己。例如用来测试一个网络程序,但又不想让局域网或外网的用户查看,只能在此台主机上运行和查看所有的网络接口。例如在我们启动一个前端工程时,在浏览器输入 127.0.0.1:3000 启动项目就能查看到自己的 web 网站,并且它只有你能看到。
wlan0 表示无线局域网(上面案例并未展示)。
host
ip 地址和主机名的互相转换。
软件安装
yum install bind-utils
基础用法
[root@lion ~]# host github.com
baidu.com has address 13.229.188.59


[root@lion ~]# host 13.229.188.59
59.188.229.13.in-addr.arpa domain name pointer ec2-13-229-188-59.ap-southeast-1.compute.amazonaws.com.
ssh 连接远程服务器
通过非对称加密以及对称加密的方式(同 HTTPS 安全连接原理相似)连接到远端服务器。
ssh 用户@ip:port

1、ssh root@172.20.10.1:22 # 端口号可以省略不写,默认是22端口
2、输入连接密码后就可以操作远端服务器了
配置 ssh
config 文件可以配置 ssh ,方便批量管理多个 ssh 连接。
配置文件分为以下几种:
全局 ssh 服务端的配置:/etc/ssh/sshd_config ;
全局 ssh 客户端的配置: /etc/ssh/ssh_config(很少修改);
当前用户 ssh 客户端的配置:~/.ssh/config 。
【服务端 config 文件的常用配置参数】
| 服务端 config 参数 | 作用 |
|---|---|
| Port | sshd 服务端口号(默认是22) |
| PermitRootLogin | 是否允许以 root 用户身份登录(默认是可以) |
| PasswordAuthentication | 是否允许密码验证登录(默认是可以) |
| PubkeyAuthentication | 是否允许公钥验证登录(默认是可以) |
| PermitEmptyPasswords | 是否允许空密码登录(不安全,默认不可以) |
systemctl restart sshd
【客户端 config 文件的常用配置参数】
| 客户端 config 参数 | 作用 |
|---|---|
| Host | 别名 |
| HostName | 远程主机名(或 IP 地址) |
| Port | 连接到远程主机的端口 |
| User | 用户名 |
config :
# 创建config
vim ~/.ssh/config

# 填写一下内容
Host lion # 别名
	HostName 172.x.x.x # ip 地址
  Port 22 # 端口
  User root # 用户
这样配置完成后,下次登录时,可以这样登录 ssh lion 会自动识别为 root 用户。
[注意] 这段配置不是在服务器上,而是你自己的机器上,它仅仅是设置了一个别名。
免密登录
ssh 登录分两种,一种是基于口令(账号密码),另外一种是基于密钥的方式。
基于口令,就是每次登录输入账号和密码,显然这样做是比较麻烦的,今天主要学习如何基于密钥实现免密登录。
基于密钥验证原理
客户机生成密钥对(公钥和私钥),把公钥上传到服务器,每次登录会与服务器的公钥进行比较,这种验证登录的方法更加安全,也被称为“公钥验证登录”。
具体实现步骤
1、在客户机中生成密钥对(公钥和私钥) ssh-keygen(默认使用 RSA 非对称加密算法)
运行完 ssh-keygen 会在 ~/.ssh/ 目录下,生成两个文件:
id_rsa.pub :公钥
id_rsa :私钥
2、把客户机的公钥传送到服务
执行 ssh-copy-id root@172.x.x.x(ssh-copy-id 它会把客户机的公钥追加到服务器 ~/.ssh/authorized_keys 的文件中)。
执行完成后,运行 ssh root@172.x.x.x 就可以实现免密登录服务器了。
配合上面设置好的别名,直接执行 ssh lion 就可以登录,是不是非常方便。
wget
可以使我们直接从终端控制台下载文件,只需要给出文件的HTTP或FTP地址。wget [参数][URL地址]
wget http://www.minjieren.com/wordpress-3.1-zh_CN.zip
wget 非常稳定,如果是由于网络原因下载失败,wget 会不断尝试,直到整个文件下载完毕。
常用参数
-c 继续中断的下载。
备份
scp
它是Secure Copy 的缩写,表示安全拷贝。scp 可以使我们通过网络,把文件从一台电脑拷贝到另一台电脑。
scp 是基于 ssh 的原理来运作的,ssh 会在两台通过网络连接的电脑之间创建一条安全通信的管道,scp 就利用这条管道安全地拷贝文件。
其中source_file 和destination_file 都可以这样表示:user@ip:file_name,user 是登录名,ip是域名或ip地址。 file_name 是文件路径。
rsync
rsync 命令主要用于远程同步文件。它可以同步两个目录,不管它们是否处于同一台电脑。它应该是最常用于“增量备份”的命令了。它就是智能版的 scp 命令。
软件安装
yum install rsync
基础用法
rsync -arv Images/ backups/ # 将Images 目录下的所有文件备份到 backups 目录下
rsync -arv Images/ root@192.x.x.x:backups/ # 同步到服务器的backups目录下
常用参数
-a 保留文件的所有信息,包括权限,修改日期等;
-r 递归调用,表示子目录的所有文件也都包括;
-v 冗余模式,输出详细操作信息。
默认地,rsync 在同步时并不会删除目标目录的文件,例如你在源目录中删除一个文件,但是用 rsync 同步时,它并不会删除同步目录中的相同文件。如果向删除也可以这么做:rsync -arv --delete Images/ backups/ 。
系统
halt
关闭系统,需要 root 身份。halt
reboot
重启系统,需要 root 身份。reboot
poweroff
直接运行即可关机,不需要root 身份。
Vim 编译器
Vim 是什么?
Vim 是从 vi 发展出来的一个文本编辑器。其代码补完、编译及错误跳转等方便编程的功能特别丰富,在程序员中被广泛使用。和 Emacs 并列成为类 Unix 系统用户最喜欢的编辑器。Vim 常用模式
交互模式 插入模式 命令模式 可视模式 交互模式 也成为正常模式,这是 Vim 的默认模式,每次运行 Vim 程序的时候,就会进入这个模式。 例如执行vim name.txt 则会进入交互模式。
交互模式特征:
在这个模式下,你不能输入文本;
它可以让我们在文本间移动,删除一行文本,复制黏贴文本,跳转到指定行,撤销操作,等等。
插入模式
这个模式是我们熟悉的文本编辑器的模式,就是可以输入任何你想输入的内容。进入这个模式有几种方法,最常用的方法是按字母键 i ( i、I、a、A、o、O 都可以进入插入模式,只是所处的位置不同),退出这种模式,只需要按下 Esc 键。
i, I 进入输入模式 Insert mode :i 为“从目前光标所在处输入”, I 为“在目前所在行的第一个非空格符处开始输入”;
a, A 进入输入模式 Insert mode :a 为“从目前光标所在的下一个字符处开始输入”,A 为“从光标所在行的最后一个字符处开始输入”;
o, O 进入输入模式 Insert mode :o 为“在目前光标所在的下一行处输入新的一行”;O 为在目前光标所在处的上一行输入新的一行。
命令模式
命令模式也称为底线命令模式,这个模式下可以运行一些命令例如“退出”,“保存”,等动作。
也可以用这个模式来激活一些 Vim 配置,例如语法高亮,显示行号,等。甚至还可以发送一些命令给终端命令行,例如 ls 、cp 。
为了进入命令模式,首先要进入交互模式,再按下冒号键。
用一张图表示三种模式如何切换:

基本操作
打开 Vim 在终端命令行中输入 vim 回车后 Vim 就会被运行起来,也可以用 Vim 来打开一个文件,只需要在 vim 后面再加文件名。如vim file.name ,如果文件不存在,那么会被创建。
插入
进入文件之后,此时处于交互模式,可以通过输入 i 进入插入模式。
移动
在 Vim 的交互模式下,我们可以在文本中移动光标。
h 向左移动一个字符
j 向下移动一个字符
k 向上移动一个字符
i 向右移动一个字符
当然也可以使用四个方向键进行移动,效果是一样的。
跳至行首和行末
行首:在交互模式下,为了将光标定位到一行的开始位置,只需要按下数字键 0 即可,键盘上的 Home 键也有相同效果。
行末:在交互模式下,为了将光标定位到一行的末尾,只需要按下美元符号键 $ 即可,键盘上的 End 键也有相同效果。
按单词移动
在交互模式下,按字母键 w 可以一个单词一个单词的移动。
退出文件
在交互模式下,按下冒号键 : 进入命令模式,再按下 q 键,就可以退出了。
如果在退出之前又修改了文件,就直接想用 :q 退出 Vim ,那么 Vim 会显示一个红字标明错误信息。此时我们有两个选择:
保存并退出 :wq 或 :x ;
不保存且退出 :q! 。
标准操作
删除字符 在交互模式下,将光标定位到一个你想要删除的字符上,按下字母键 x 你会发现这个字符被删除了。 也可以一次性删除多个字符,只需要在按 x 键之前输入数字即可。 删除(剪切)单词,行 删除一行:连按两次d 来删除光标所在的那一行。
删除多行:例如先输入数字 2 ,再按下 dd ,就会删除从光标所在行开始的两行。
删除一个单词:将光标置于一个单词的首字母处,然后按下 dw 。
删除多个单词:例如先按数字键 2 再按 dw 就可以删除两个单词了。
从光标所在位置删除至行首: d0 。
从光标所在位置删除至行末: d$ 。
复制单词,行
复制行:按两次 y 会把光标所在行复制到内存中,和 dd 类似,dd 用于“剪切”光标所在行。
复制单词:yw 会复制一个单词。
复制到行末:y$ 是复制从光标所在处到行末的所有字符。
复制到行首:y0 是复制光标所在处到行首的所有字符。
粘贴
如果之前用 dd 或者 yy 剪切复制过来的,可以使用 p 来粘贴。同样也可以使用 数字+p 来表示复制多次。
替换一个字符
在交互模式下,将光标置于想要替换的字符上。按下 r 键,接着输入你要替换的字符即可。
撤销操作
如果要撤销最近的修改,只需要按下 u 键,如果想要撤销最近四次修改,可以按下4,再按下 u 。
重做
取消撤销,也就是重做之前的修改使用 ctrl + r 。
跳转到指定行
Vim 编辑的文件中,每一行都有一个行号,行号从1开始,逐一递增。
行号默认是不显示,如果需要它显示的话,可以进入命令模式,然后输入 set nu ,如果要隐藏行号的话,使用 set nonu 。
跳转到指定行:数字+gg ,例如 7gg ,表示跳转到第7行。
要跳转到最后一行,按下 G 。
要跳转到第一行,按下 gg 。
高级操作
查找 处于交互模式下,按下/ 键,那么就进入查找模式,输入你要查找的字符串,然后按下回车。光标就会跳转到文件中下一个查找到的匹配处。如果字符串不存在,那么会显示 "pattern not found" 。
n 跳转到下一个匹配项;
N 跳转到上一个匹配项。
[注意] 用斜杠来进行的查找是从当前光标处开始向文件尾搜索,如果你要从当前光标处开始,向文件头搜索则使用 ? ,当然也可以先按下 gg 跳转到第一行在进行全文搜索。
查找并替换
替换光标所在行第一个匹配的字符串:
# 语法
:s/旧字符串/新字符串

# 实例
:s/one/two
替换光标所在行所有旧字符串为新字符串:
# 语法
:s/旧字符串/新字符串/g
替换第几行到第几行中所有字符串:
# 语法
:n,m s/旧字符串/新字符串/g

# 实例
:2,4 s/one/two/g
最常用的就是全文替换了:
# 语法
:%s/旧字符串/新字符串/g
合并文件
可以用冒号 +r ( :r ) 实现在光标处插入一个文件的内容。
:r filename # 可以用Tab键来自动补全另外一个文件的路径
分屏
Vim 有一个特别便捷的功能那就是分屏,可以同时打开好几个文件,分屏之后,屏幕每一块被称为一个 viewport ,表示“视口”。
横向分屏 : sp 文件名
垂直分屏 : vsp 文件名
分屏模式下的快捷键
Ctrl + w 再加 Ctrl + w ,表示从一个 viewport 移动光标到另外一个 viewport ;
Ctrl + w 再加 “方向键”,就可以移动到这个方向所处的下一个视口了;
Ctrl + w 再加 + 号,表示扩大当前视口;
Ctrl + w 再加 - 号,表示缩小当前视口;
Ctrl + w 再加 = 号,表示平均当前视口;
Ctrl + w 再加 r 键,会反向调换视口位置;
Ctrl + w 再加 q 键,会关闭当前视口;
Ctrl + w 再加 o 键,会关闭除当前视口以外的所有视口;
运行外部命令 :!
在 Vim 中可以运行一些终端命令,只要先输入 :! ,然后接命令名称。
例如:
:!ls # 在Vim中打开的文件所在的目录运行ls命令
可视模式
前面只讲了 Vim 的三种模式,其实还有一种模式叫做可视模式。
进入它的三种方式(都是从交互模式开始):
v 字符可视模式,进入后配合方向键选中字符后,然后再按 d 键可以删除选中。
V 行可视模式,进入后光标所在行默认被选中,然后再按 d 键可以删除所在行。
Ctrl + v 块可视模式,它是可视模式最有用的功能了,配合 d 和 I 键可以实现删除选中的内容和插入内容。
同时选中多行,并在选中行头部插入内容的具体操作步骤:
1. ctrl + v 进入块可视模式
2. 使用方向键进行选中(上下左右)假设选中5行
3. 输入 I 键进行多行同时插入操作
4. 插入完成后连续按两下 esc 键,实现多行同时插入相同字符
进入可视模式之后的操作键:
d 键,表示删除选中;
I 键,表示在选中之前插入;
u 键,表示选中变为小写;
U 键,表示选中变为大写;
Vim 配置
选项参数 在 Vim 被启动后,可以运行一些指令来激活一些选项参数,但是这些选项参数的配置在退出 Vim 时会被忘记,例如前面讲解的激活行号。如果希望所在的配置是永久性的,那么需要在家目录(cd ~ )创建一个 Vim 的配置文件 .vimrc 。
.vimrc
Vim 配置非常丰富,我们可以通过个性化配置把 Vim 打造成属于自己的 IDE 等等。在 github 上也可以搜索到一些强大的 Vim 配置文件。